
New Custom Template
Table of Contents
1. Features
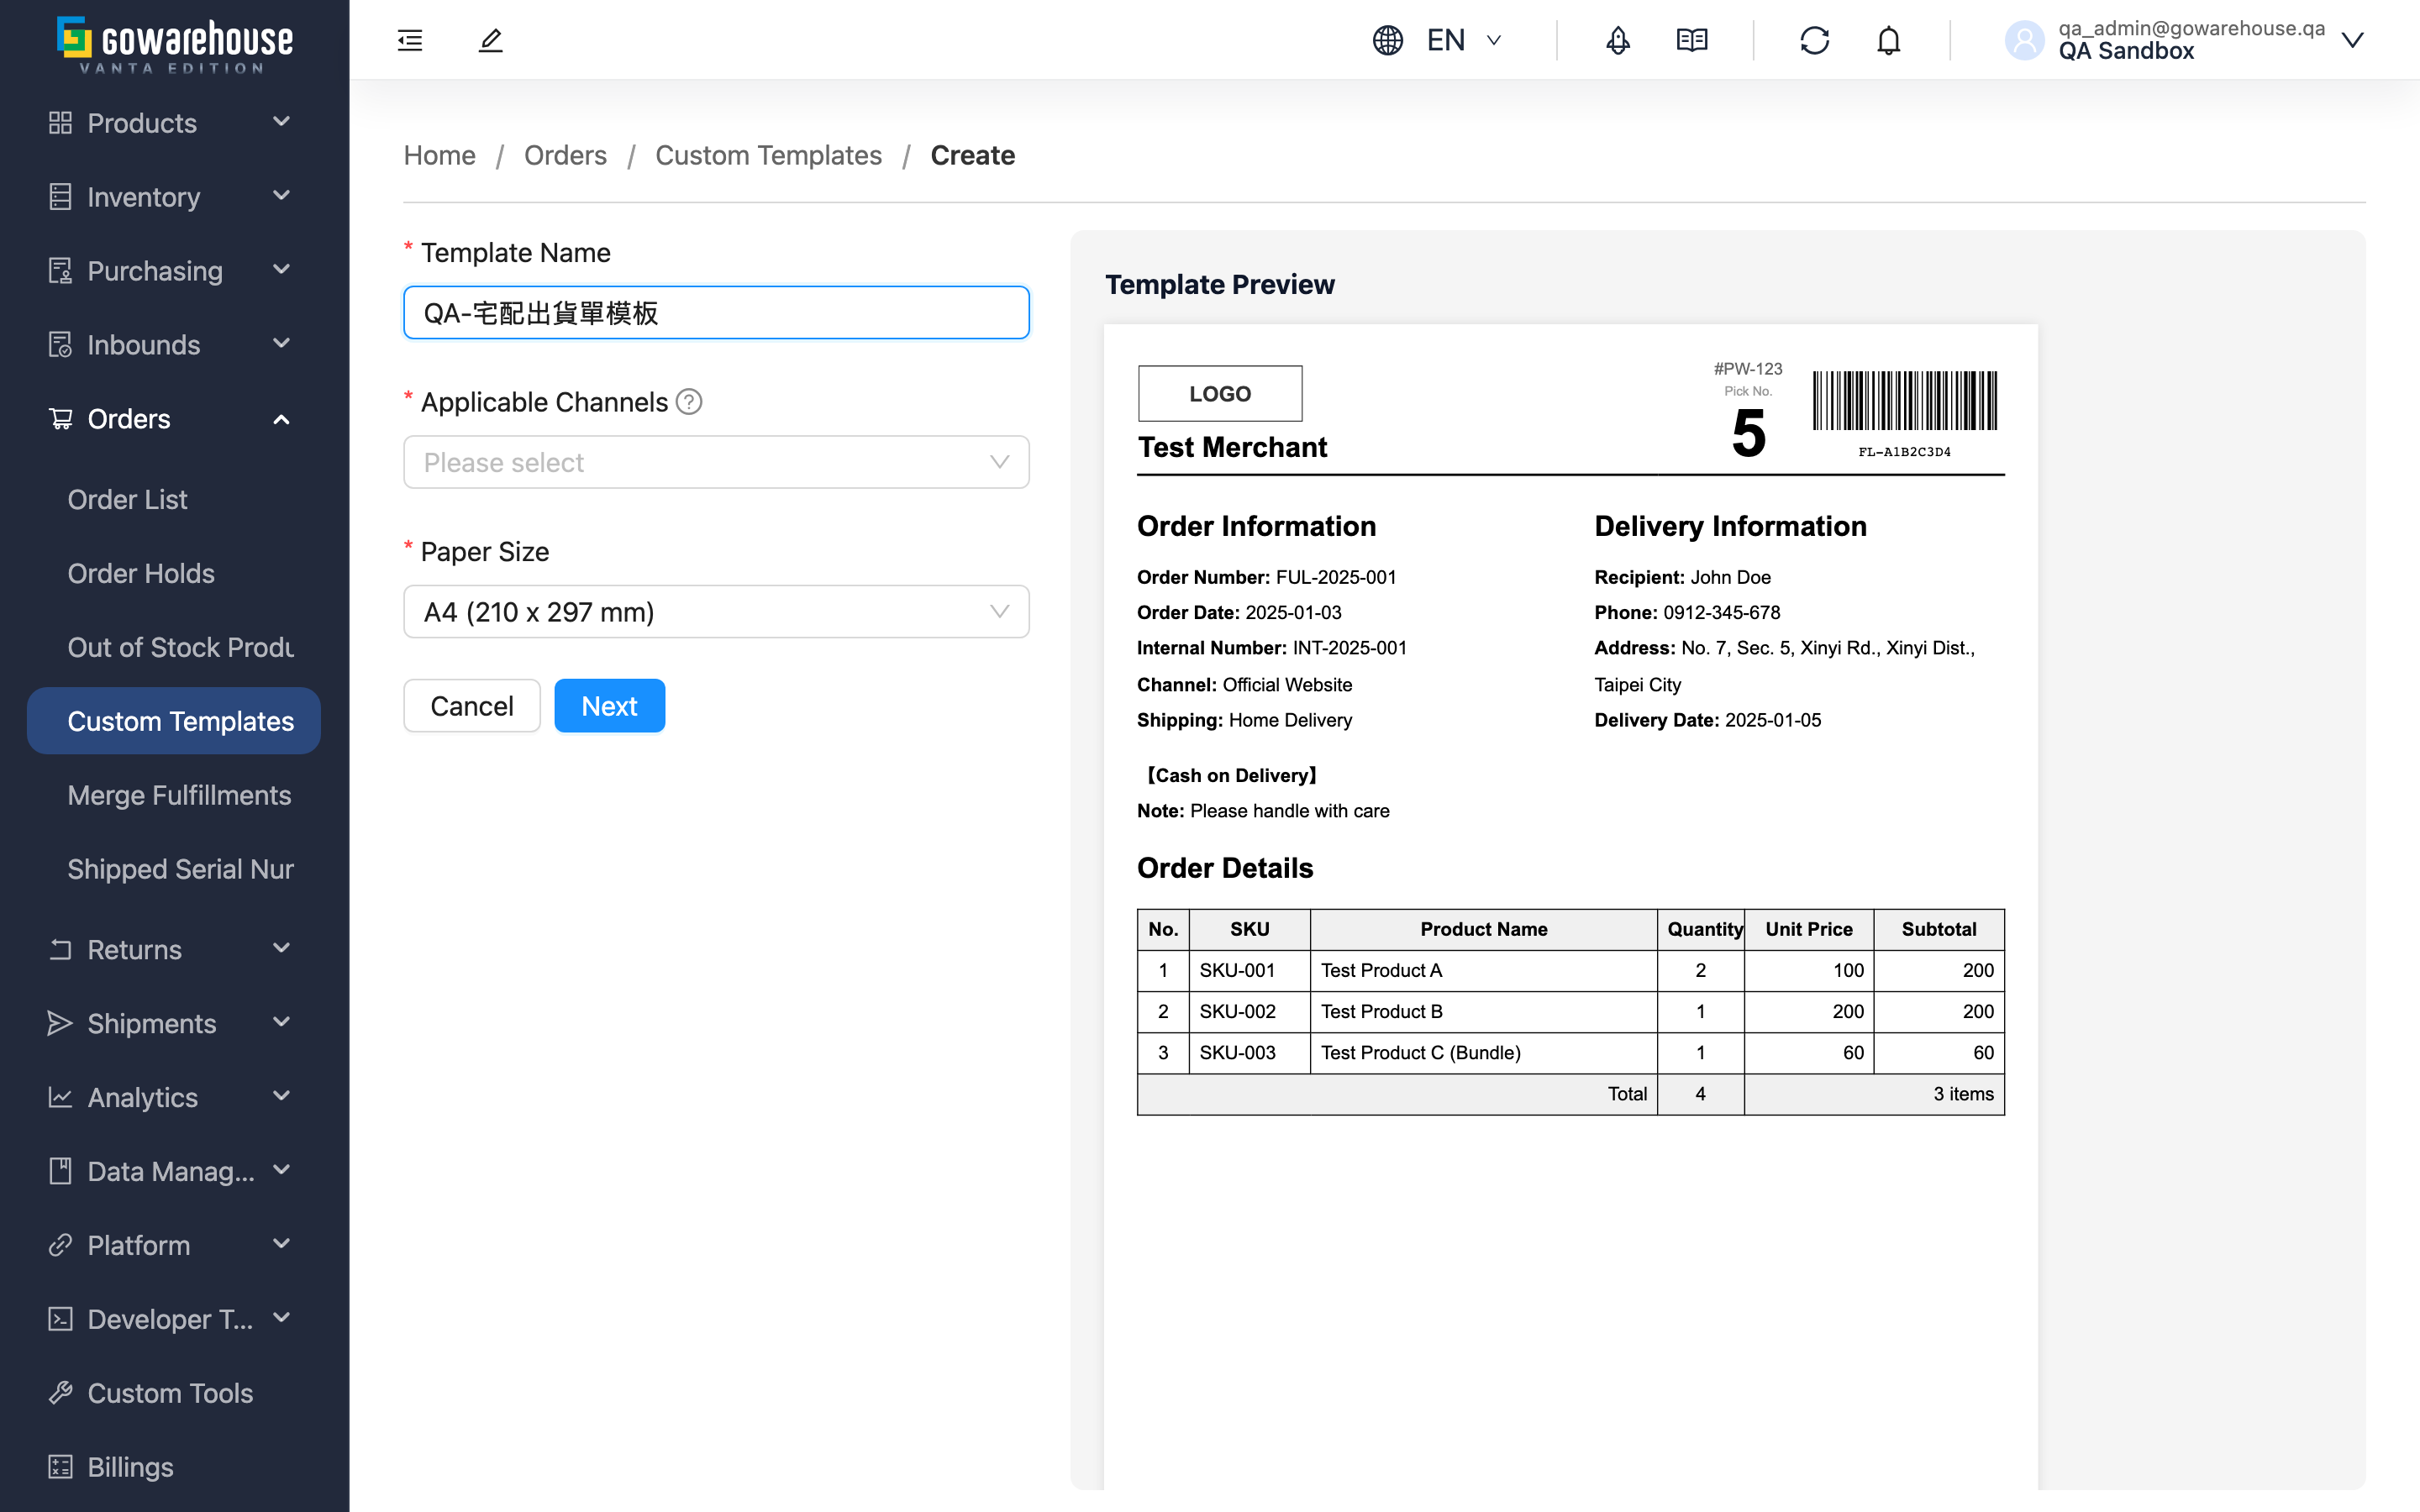
The New page lets you build a dedicated shipping-document template for specific sales channels. Creation has two steps: first fill in the basic settings (name, bound channels, paper size), then move on to the layout content. When the page opens it automatically loads the system default template as a starting point — you can use it as is, or modify it, and confirm the result anytime via the live preview on the right.
Quick Jump: Basic Settings | Layout Content | Live Preview
1.1 Basic Settings
Fields marked with * are required
| Field | How to fill in | Notes |
|---|---|---|
| *Template Name | Enter an identifying name; describe its purpose clearly | e.g. "Shopee Shipping Doc", "Website A4 Details" |
| *Applicable Channels | Select the sales channels this template applies to; multiple allowed | If a channel is missing, add it first under "Merchant Channels" |
| *Paper Size | Choose A4 (210×297mm), A5 (148×210mm), or Custom | When "Custom" is chosen, also enter paper width and height (mm) |
| Description | Enter a note to help identify the purpose later | Optional |
After filling in the basic settings, click "Next" to move to the layout content; click "Previous" to go back and revise.
Tip: A channel uses only one template at a time. If a channel you select was already bound to another template, saving will rebind it to this new template automatically.
1.2 Layout Content
At step two, the system loads the default shipping-document template as a starting point, already including the store logo area, order and recipient information, the item details table, and the barcode area. You can use it as is, or click "Edit HTML" to open the advanced editor and adjust the layout.
The template uses dynamic fields to fill in each order's real data automatically (recipient, item details, tracking number, etc.). When unsure which fields are available, click "View Variables" to open the variable reference, then search for and copy the fields you need.
1.3 Live Preview
The panel on the right renders the template live with sample order data and updates automatically as you make changes, so you can adjust and verify the layout at the same time. When everything looks right, click "Save". To create several templates in a row, click "Save and Add Another" instead — after saving, the form clears and returns to the first step.
2. FAQ
2.1 FAQ
▪ Do I have to select a channel?
Yes. Applicable Channels is required; you must select at least one to save. Channels without a bound template use the system's built-in default layout for shipping documents.
▪ Can I bind multiple channels at once?
Yes. Applicable Channels supports multiple selection, and this template will apply to all selected channels.
▪ Where does the default template content come from?
The system provides a standard shipping-document template with common field arrangements, loaded automatically when you reach the layout content step. You can modify it instead of starting from scratch.
▪ How do I print the storefront product name from the platform on shipping documents?
Click "View Variables" to see the description of "平台賣場品名" (platform storefront product name) under the "Order Items" group. To apply it, change item.product.name to item.platform_product_name inside the item details loop of the layout content. Orders imported from an e-commerce platform then print the product name shown on the storefront; when the platform provides no name, or for manually created orders, imported orders, stock transfer orders and work orders, the same field automatically prints the master product name instead of leaving a blank. Sub-items expanded from bundle products and flexible products have no storefront name of their own, so they also print the master product name. Existing templates are not updated automatically — templates without this field print exactly as before.
▪ How do I print the convenience store pickup code on shipping documents?
Click "View Variables" and search "超商" under the "Order Information" group to find "超商取貨門市代號" (convenience store pickup store code), then use the copy action on the card to paste the syntax into the layout content (the variable is order.convenience_store_code). Convenience store pickup orders print the store code carried on the order — the same value shown on the order detail page; some platforms return the store name instead of the code, and the printout follows whatever value is actually stored on the order. Home delivery and other non-pickup orders, orders where the platform provided no code, and shipping documents generated from stock transfer orders or work orders leave this spot blank without affecting printing. For merged shipments, order.convenience_store_code prints the code of the earliest-placed order; to print each order's own code, use the loop variable inside the fulfillment.orders loop instead (for example o.convenience_store_code).
▪ How do I print the total weight and total volume of the whole shipping document?
Click "View Variables" and search "重量" (weight) or "材積" (volume) under the "Fulfillment Information" group to find "出貨單總重量" (fulfillment total weight) and "出貨單總材積" (fulfillment total volume), then use the copy action on the card to paste the syntax into the layout content (the variables are fulfillment.total_weight and fulfillment.total_volume). Both numbers are the total of the shipping document itself: for merged shipments they cover every order on the document, and shipping documents generated from stock transfer orders or work orders also print the total of the items on them. Weight is always in kilograms; the volume unit follows the system "Volume Unit" setting and is either "Cubic Meters (CBM)" or "Sai (材, 27,000 cm³)" — that setting is maintained by the warehouse side, so you cannot see or change it from your side; contact the warehouse if it needs to change. To print the unit next to the number, add fulfillment.total_volume_unit — it prints CBM or CUFT, always matching the value of fulfillment.total_volume. Existing templates are not updated automatically — templates without these fields print exactly as before.
▪ Why does the total weight or total volume print as 0?
The total weight adds up the master product unit weight multiplied by the shipped quantity, and the total volume adds up the unit length, width and height multiplied by the shipped quantity; a field left empty counts as 0, so start by checking the unit weight and the unit length, width and height on the product master record. The volume also depends on which "Volume Unit" the system uses: under "Sai (材, 27,000 cm³)", a product with no unit length, width or height still gets a volume as long as the large unit (box) dimensions and the items per large unit are filled in, derived from box volume ÷ items per large unit, so it is not 0; under "Cubic Meters (CBM)" there is no such fallback, and missing unit dimensions count as 0. If the master record is complete and the total still prints 0, the total on this document is simply below the output precision — it does not mean the master record is missing values: the total volume keeps five decimal places and the total weight keeps three, and the rounding happens after the whole document is summed up, so the threshold applies to the document total rather than to a single item. On a document measured in "Cubic Meters (CBM)", a total volume under 5 cubic centimetres prints 0 (for example a single 2x2x1 cm screw); on one measured in "Sai (材, 27,000 cm³)" the threshold is 0.135 cubic centimetres (for example a single 0.5x0.5x0.5 cm bead). For the total weight the threshold is 0.5 grams: a product weighing 0.0002 kg prints 0.0 for one piece and 0.001 once three pieces ship. Ship enough of the same product and the number appears, so a 0 on a small document of jewellery or electronic parts is expected. Missing values and numbers below the threshold both count as 0 in the total and never interrupt printing.
▪ What if the channel I want to bind is missing?
Create that channel first under "Merchant Channels", then return to this page and it will be selectable.
▪ It says the template content is missing the barcode area on save — what do I do?
The template content must keep the barcode area field so that the shipping document can correctly print the pick number and barcode. If you accidentally removed it in the advanced editor, restore that field before saving.
▪ Can I change the channel binding after creating?
Yes. Modify Applicable Channels on the Edit Custom Template page.
2.2 Notices
⚠️ Important Notes
- Every template must be bound to at least one sales channel to be saved
- Binding a channel to this template automatically removes it from the template it was bound to before
- The template content must keep the barcode area field, otherwise it cannot be saved
- When paper size is "Custom", width and height are required and must be greater than 0
💡 Tip: If you are unsure how to change the layout, create it using the default template first and bind the channels; you can always fine-tune later on the edit page.
3. Related Features
| Feature | Description | Link |
|---|---|---|
| Custom Templates | View all shipping-document templates | Go |
| Custom Template Details | Preview the layout and view bound channels | Go |
| Edit Custom Template | Modify template settings and layout content | Go |