
Import Orders
Table of Contents
1. Use Cases
Quick links: Import a batch at once | Apply a merchant's own format
Case 1: The merchant sends a batch of orders at once
Situation: The merchant runs a campaign and sends the warehouse one Excel file with the few hundred orders to ship, asking you to enter them all into the system today to prepare for shipping. Adding them one by one would never finish in time.
Use this feature: After arranging the merchant's file into the system template format, use Import to create the whole batch of orders at once. The flow and fields are under Flow overview and Field reference.
Result: Hundreds of orders are created at once and enter the allocation flow together, saving the work of entering each one, so picking and shipping can start the same day.
Case 2: The merchant's file uses different column names
Situation: A certain merchant always sends files with their own column names ("Order No.", "Recipient", "Item code"...) that don't match the system template column names, and manually renaming columns before each import is tedious.
Use this feature: First build an import template for this merchant that maps their column names to the system fields; then select this template when importing, and the system reads the file by that mapping without renaming columns each time. The purpose of templates is under Flow overview.
Result: A regular merchant only sets up the template once, and from then on can import using their original file directly without converting columns.
2. Features
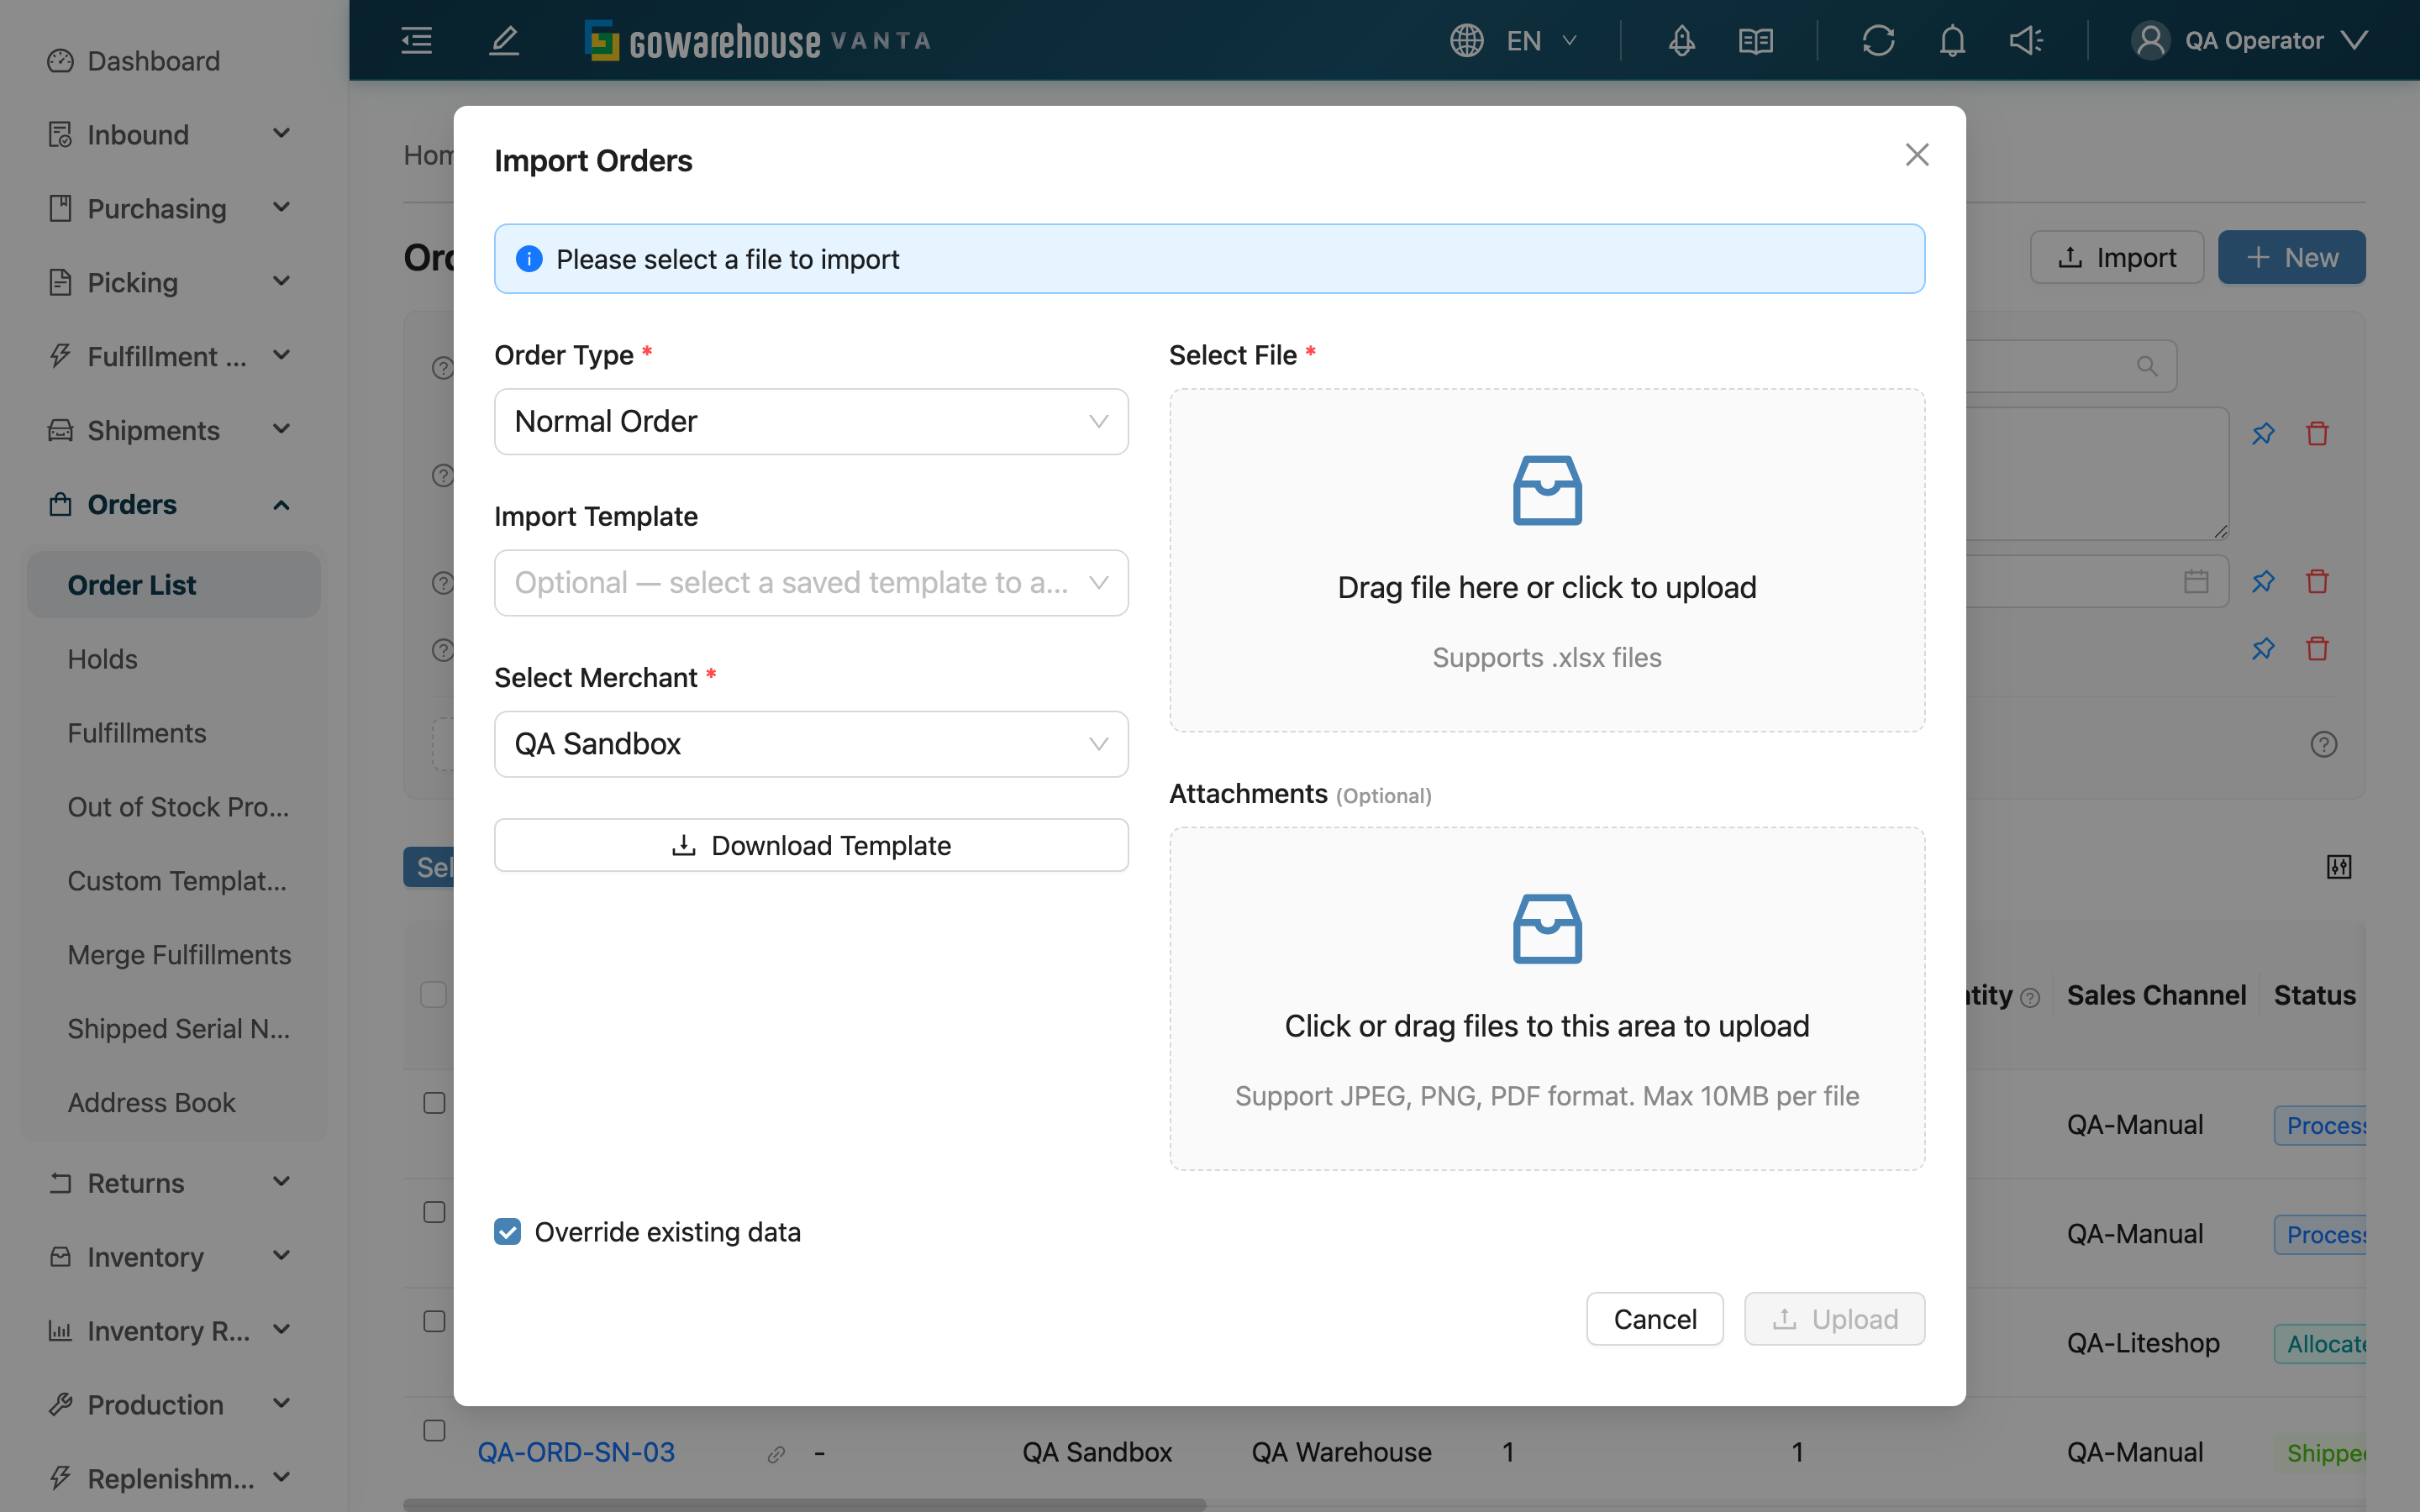
Import Orders lets you create a large number of orders from one Excel file, ideal when a merchant provides a batch of orders, or when orders exported from an external system are brought in. Import is opened from the "Import" button at the top right of the order list and runs as a pop-up flow: select the merchant, select the file, upload, and the system creates the orders and products one by one, reporting success or failure for each row.
Quick jump: Flow overview | Steps | Field reference
2.1 Flow Overview
The whole import flow is: open the import dialog → download the template, fill in data → select the merchant and upload the file → the system creates rows one by one → view results in the import list. Two concepts to clarify first:
- Import template (downloadable): The standard Excel format the system provides, with complete fields and correct column names. We recommend downloading the template and filling it in the first time.
- Import mapping template: A "column mapping" for a regular merchant. When a merchant's file column names differ from the system template, build a template in advance that maps their columns to the system fields; then selecting the template lets the system read their original file directly without renaming columns each time. You don't need to select one if there's no special format need.
You can also upload attachments (such as a shipping proof or invoice scan) when importing. These attachments are attached to the import batch and shown on every order detail page created by that import.
2.2 Steps
▸ Step 1: Download the template, fill in data
In the import dialog, click "Download Template" to get the standard format, and fill in the orders and products per the Field reference. Fields marked * are required. When an order has multiple products, the first row holds the order fields plus the first product; put each subsequent product on its own row with the order-number column left empty.
We recommend opening the template in Excel.
▸ Step 2: Select the merchant, select the file
In the dialog, select the merchant this batch belongs to (a single-merchant warehouse fills it in automatically), select an import template if needed, then use "Select File" to choose the filled file. The file must be Excel (.xlsx / .xls), up to 10MB per file.
▸ Step 3: Decide whether to overwrite existing orders
"Override existing data" decides how an "order number already exists" case is handled:
- Checked: Updates the existing order. But if that order is already shipped or canceled it can't be updated, and that row reports failure; the recipient name must also match the existing order when updating.
- Unchecked: A row with a duplicate number reports failure directly and does not overwrite.
▸ Step 4: Upload and view results
Click "Upload" to submit. Import creates rows one at a time, so a single bad row only fails that row, and the rest of the orders are still created. After it finishes, go to "Import List" to view this import's status, success / failure counts, and the error reason for each row.
2.3 Field Reference
Fields marked * are required.
Order fields (filled on the first row of each order)
| Field | How to fill | Notes |
|---|---|---|
| *Order Number | This order's number | Must be unique within a merchant |
| *Receiver Name | Recipient's full name | Required |
| *Phone | Recipient's phone | Required |
| *Address | Delivery address | Required |
| *Channel Code | Channel code | The template includes a reference sheet listing every available code. The channel name is also accepted; the row only fails when neither matches |
| *Shipping Type | Shipping method name | Must match the shipping name configured in the system |
| COD Amount | COD amount (number) | Leave empty for non-COD |
The remaining order fields (Other Number, Email, address details, Total Price, Currency, Urgent, Note, delivery / scheduled dates, Convenience Store Code) are filled by column name.
Product line fields (filled on every row)
| Field | How to fill | Notes |
|---|---|---|
| *Item code | Product SKU | Prefer items that already exist in the system; an item code the system doesn't have is created as an unknown product or fails the row, per merchant settings |
| *Inventory Type code | Inventory type name | Must match the merchant's inventory types |
| *Expected Quantity | Order quantity | Must be greater than 0 |
The remaining product fields (Unit Price, batch, expiration, manufacturing date, note) are filled as needed; date format is YYYY-MM-DD.
3. FAQ
Quick jump: Common errors | Notices
3.1 Common Errors
The import details under "Import List" show the error reason for each row. The common categories are:
▪ Required field missing
Any missing recipient, phone, address, item code, quantity, or inventory type code fails the row. Fill in the required fields per the Field reference.
▪ Data doesn't match system settings
The channel code, shipping method, or inventory type code isn't found in the system. Confirm the value matches the merchant's settings (copying from the template's reference sheet is recommended; the channel column accepts either the code or the channel name, and case is ignored).
▪ Data conflict
The order number already exists. Without "Override existing data" checked, the row fails; with it checked, it also fails if the order is shipped / canceled, or the recipient name doesn't match the existing order.
▪ Quantity or date format error
Quantity must be a number greater than 0; date fields must be YYYY-MM-DD. A row with the wrong format fails.
3.2 Notices
⚠️ Important Notice
- Import creates rows one by one; a single bad row only affects that row while the rest are still created. Be sure to check the failure count and reasons under "Import List", fix them, then re-import the failed rows.
- Checking "Override existing data" updates existing orders; shipped / canceled orders can't be updated, and the recipient name must match the existing order when updating.
- When an order has multiple products, only the first row holds the order fields; leave the order-number column empty on the following product rows, or they'll be treated as separate orders.
💡 Tip: For your first import, download the standard format with "Download Template" and fill it in — the column names and order are least likely to go wrong. Consider building an import template only for regular merchants.
4. Related Features
| Feature | Description | Link |
|---|---|---|
| Order List | Back to the order list | Go |
| New Order | Create a single order manually instead | Go |
| Custom Templates | Manage custom templates for import | Go |