
Generate Picking Lists
Table of Contents
1. Use Cases
Quick Links: Turn pending fulfillments into actionable work | Pick and pack different carriers separately | Multiple people pick the same batch during peak
Scenario 1: Morning Start — Turn Today's Pending Fulfillments into Actionable Picking Work
Situation: First thing in the morning, hundreds of fulfillments waiting to ship have piled up in the system. But a fulfillment itself is only a record of "what goods go to whom" — it is not an instruction warehouse staff can carry to the shelves and pick from.
Use this feature: Here you filter the fulfillments to process today and, once confirmed, generate picking lists. The system groups the fulfillments into waves and produces picking lists one by one, each being an actual picking sheet.
Result: The generated picking lists appear in the picking list list, ready to be assigned to warehouse staff to start picking.
Scenario 2: Goods for Different Carriers and Sales Channels Must Be Picked and Packed Separately
Situation: The warehouse handles several shipping types at once — black cat home delivery, convenience-store pickup, self-delivery, and more. Picking them mixed together to the packing station easily causes order mix-ups, and downstream labeling and loading get jammed too.
Use this feature: In split settings, enable grouping into waves by shipping method and by sales channel. The system places fulfillments of the same nature into the same wave.
Result: Goods in the same wave share the same carrier and sales channel, so once picked they can flow straight into the corresponding packing and loading process, reducing sorting and order mix-ups.
Scenario 3: Shipping Peak — Multiple People Need to Pick the Same Batch at Once
Situation: During big promotions or peak seasons, order volume spikes. A single sheet packed with hundreds of product types cannot be picked completely or accurately by one person.
Use this feature: In split settings, set the maximum product types and maximum quantity per picking list, and the system automatically splits the same wave into several shorter picking lists.
Result: Several warehouse staff each take a picking list and work in parallel, shortening the time to complete the whole batch.
2. Features
This is the starting point of picking work. A fulfillment only states "what goods to ship"; this page is responsible for turning fulfillments into the actual picking sheets in warehouse staff's hands: first filter the fulfillments to process, then decide how to group them into waves and how to split the lists, and once generated they can be assigned to staff to start picking. Once you are familiar with it, pairing this with filter templates lets you do "pick a template → confirm → start picking".
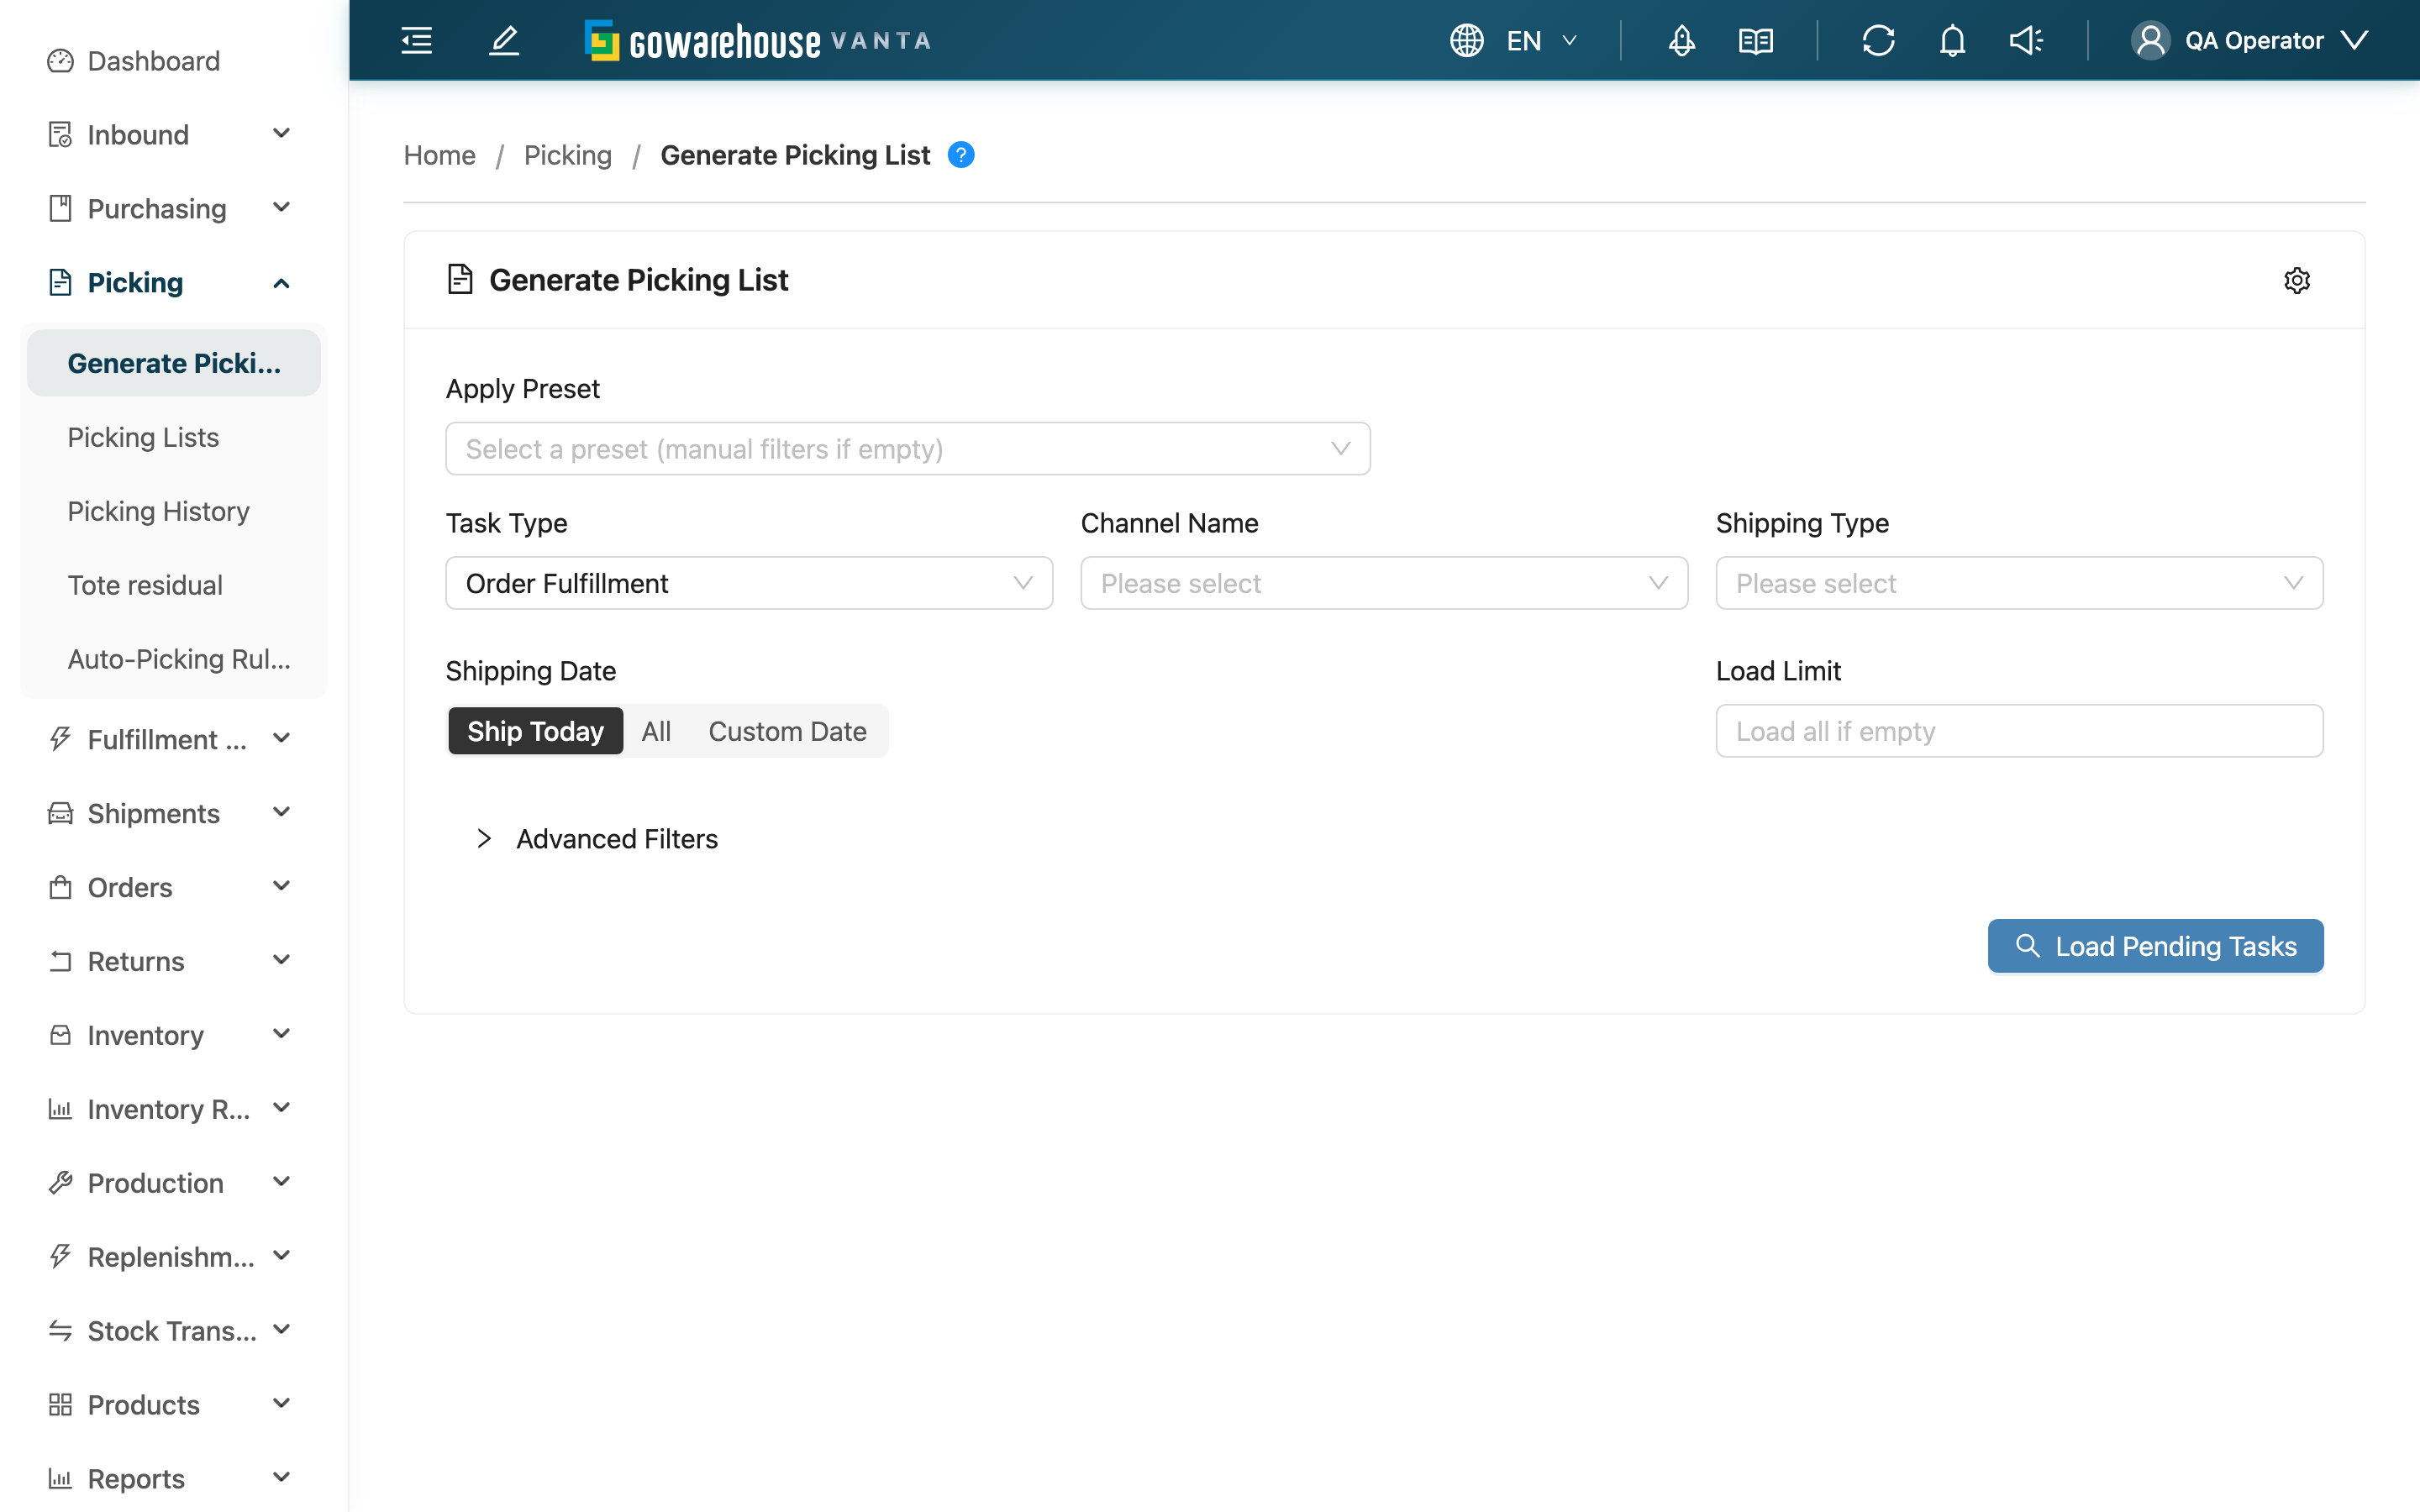
Quick Navigation: Filter Fulfillments | Choose Picking Method | Wave and Split Settings | Apply Filter Template | Generate and View Results
2.1 Filter the Fulfillments to Pick
First use the filter conditions to pull out the fulfillments to include in this picking round. After clicking Load Pending Tasks, the matching fulfillments are listed below for selection. Only fulfillments that are "allocated and not yet started" are pulled out; those already in another picking list, already shipped, or already canceled do not appear.
Fields marked with * are required
| Filter | How to fill | Note |
|---|---|---|
| *Merchant Name | In multi-merchant operations, choose which merchant's goods to pick | A single round can only generate picking lists for one merchant |
| Scheduled Shipping Date | One of three: Ship Today, All, Custom Date (a date range appears only after you choose it) | Defaults to Ship Today, to avoid pulling out too many historical records at once; whichever you choose, fulfillments whose order has no shipping date are pulled out as well |
| Order Requested Delivery Date | Pick a date range, or use the Today / Tomorrow shortcuts | Not set by default, and it does not filter unless you set it. Once set, only fulfillments whose order has a requested delivery date within the range are pulled out; orders without a requested delivery date, along with work orders and stock transfer orders (which have no order at all), are excluded. To cancel the condition, clear the dates |
| Channel Name | Pick only orders from a specific sales channel (e.g. Shopee, official site) | — |
| Shipping Type | Pick only orders for a specific carrier (e.g. black cat, convenience store) | — |
| Maximum Fulfillments | Limit how many fulfillments are pulled out at most this round | Avoids pulling out too many at once and jamming the work |
Other advanced conditions include specific products, order numbers, product SKU count, notes, and urgent orders. Product combination matching has three modes: All, Products & Quantity, and Products Only. Min. Fulfillments per Combination is applied to each combination separately: when set to 3, a combination shared by only 2 fulfillments is excluded entirely. To target single-item fulfillments, set Product SKU Count to 1 and then choose the required combination mode. Urgent orders are automatically placed at the top of the list.
The two Note Filter options are complementary and never overlap: a fulfillment counts as Has Note as soon as any one of its orders carries a note; No Note lists only fulfillments whose orders all have no note, along with work orders and stock transfer orders that have no order at all. The two lists added together are exactly what All pulls out.
After loading, the task table shows order notes in the Note column. If a fulfillment combines multiple orders, blank notes are ignored and the remaining notes are joined with semicolons (;). A fulfillment without a note displays -. Long notes stay within a fixed-width column and are truncated; hover over the text to see the full note.
The search box above the table filters only the tasks already loaded in this session. You can search by fulfillment number, order number, recipient, or order note; it does not query the backend for additional fulfillments.
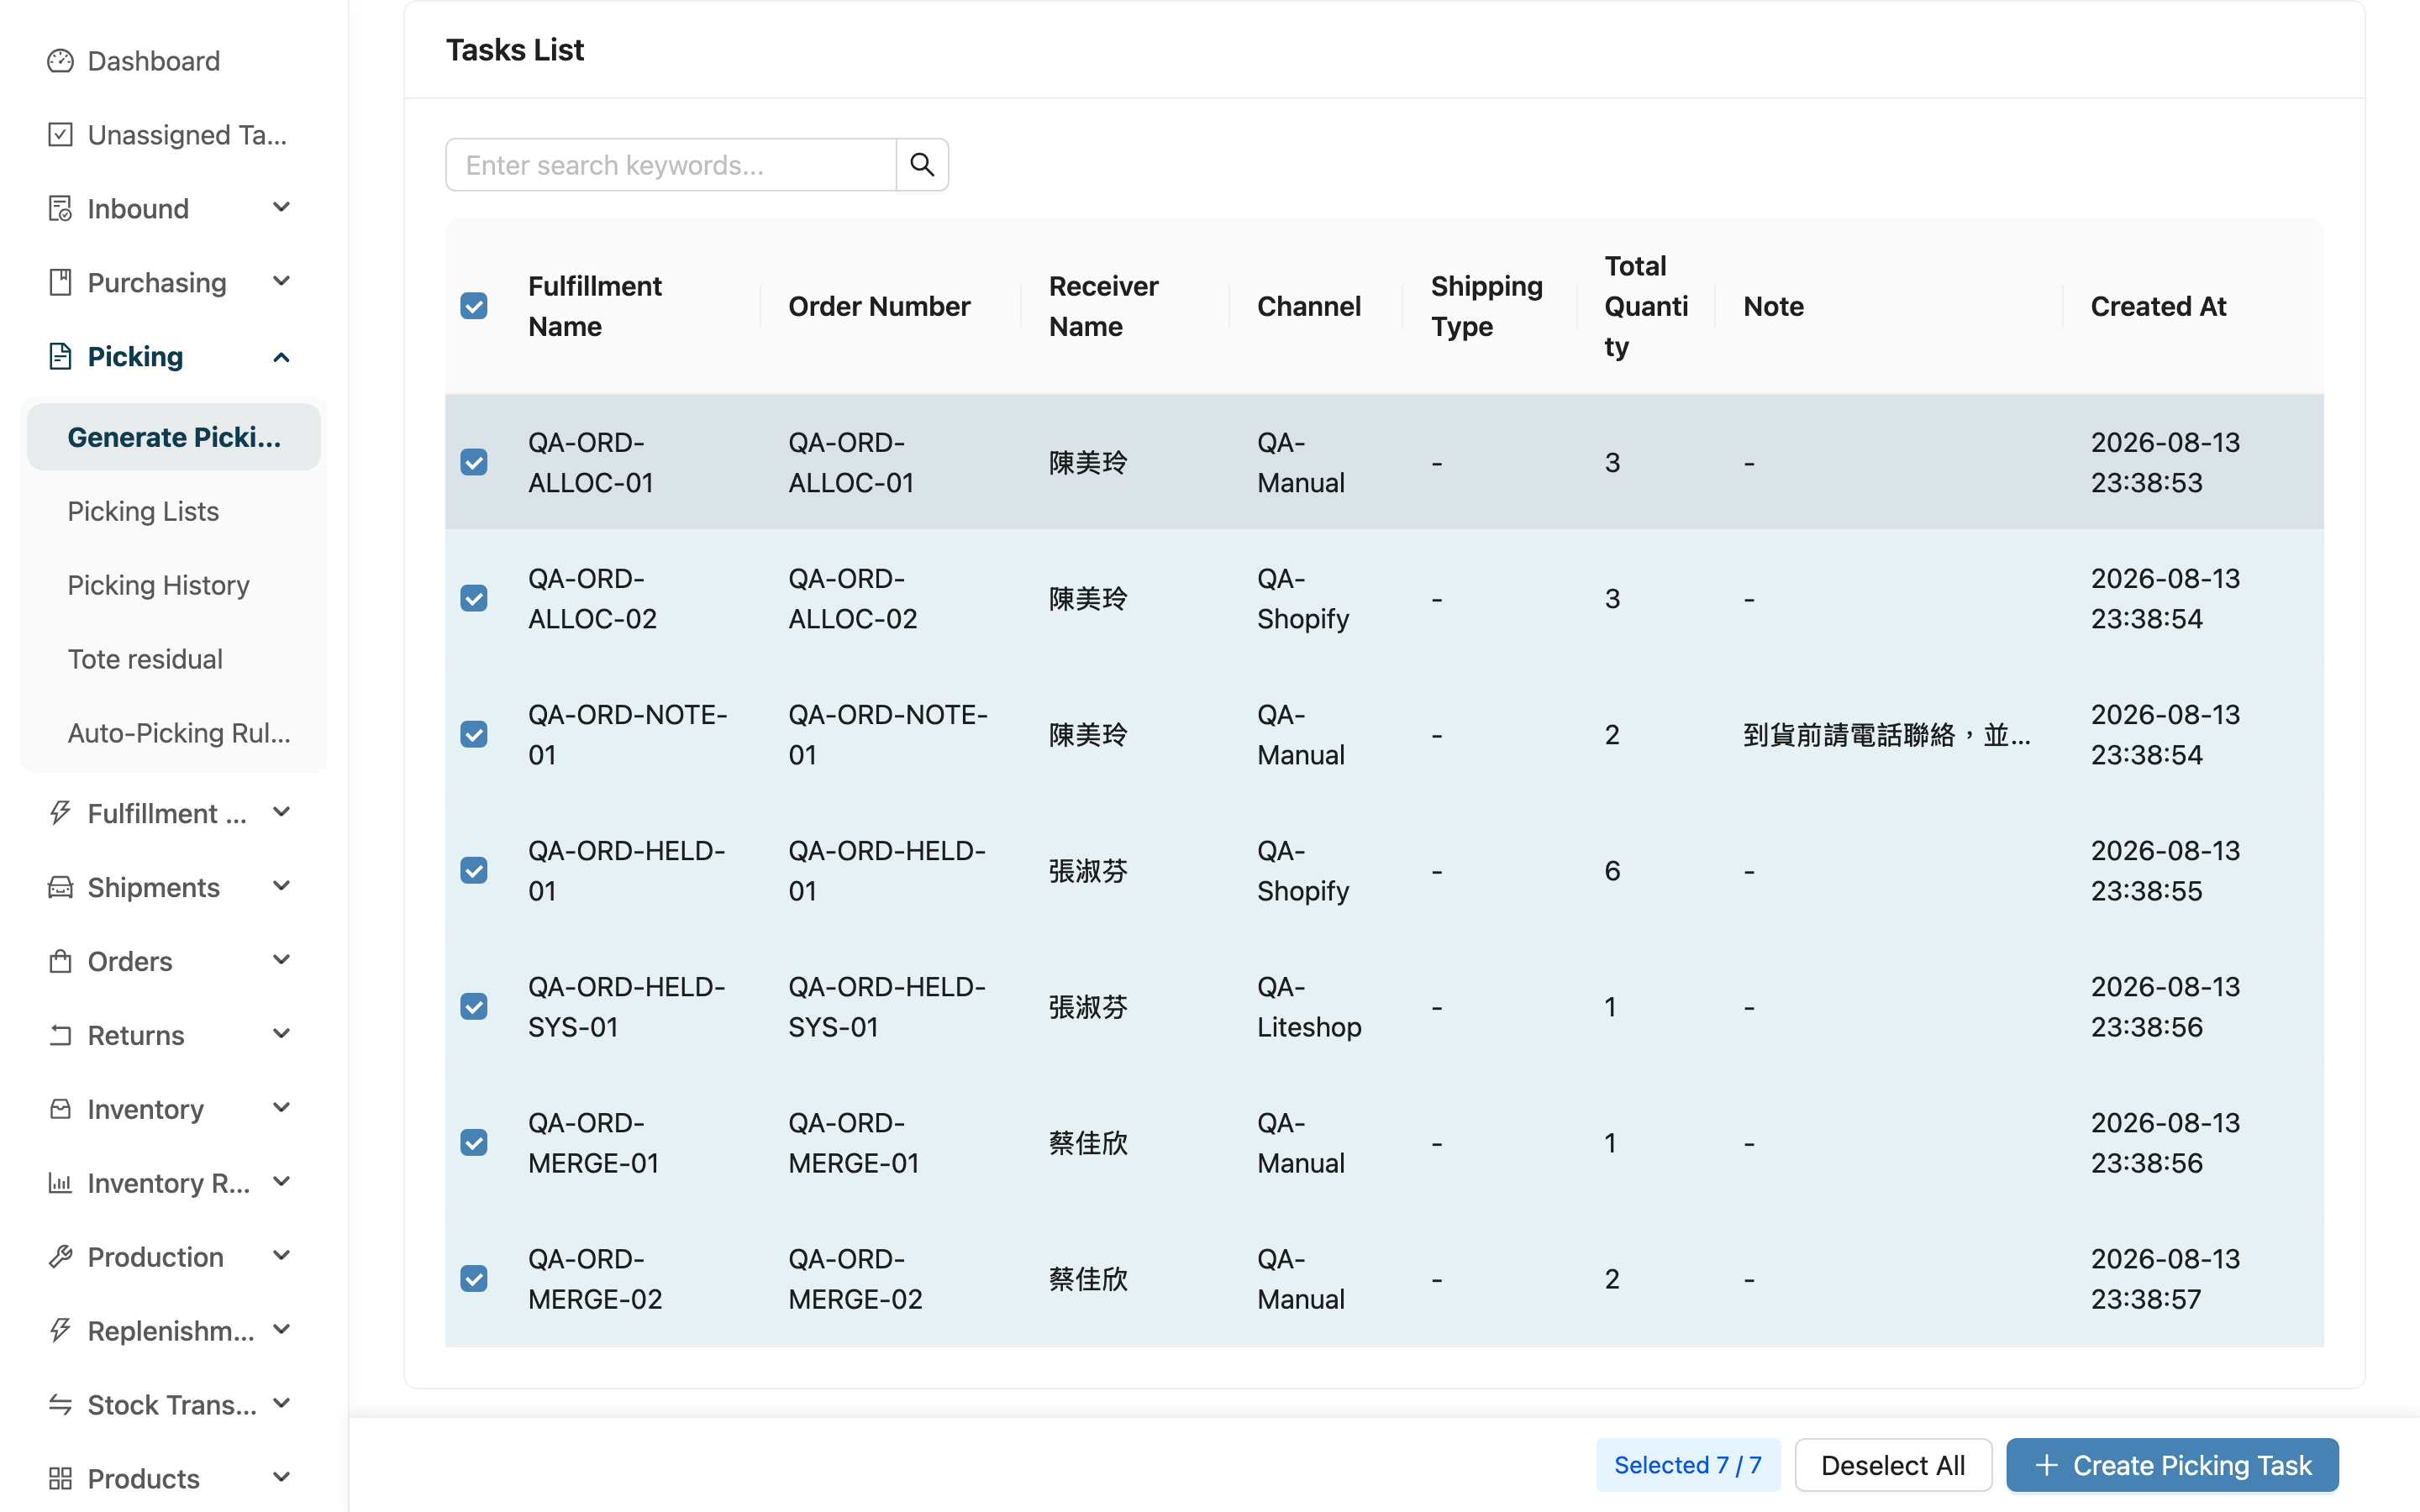
2.2 Choose the Picking Method
After selecting the fulfillments to pick, click Create Picking Task, and in the settings panel that pops up, choose the Picking Mode. This choice determines how the generated picking lists are picked and cannot be changed after generation:
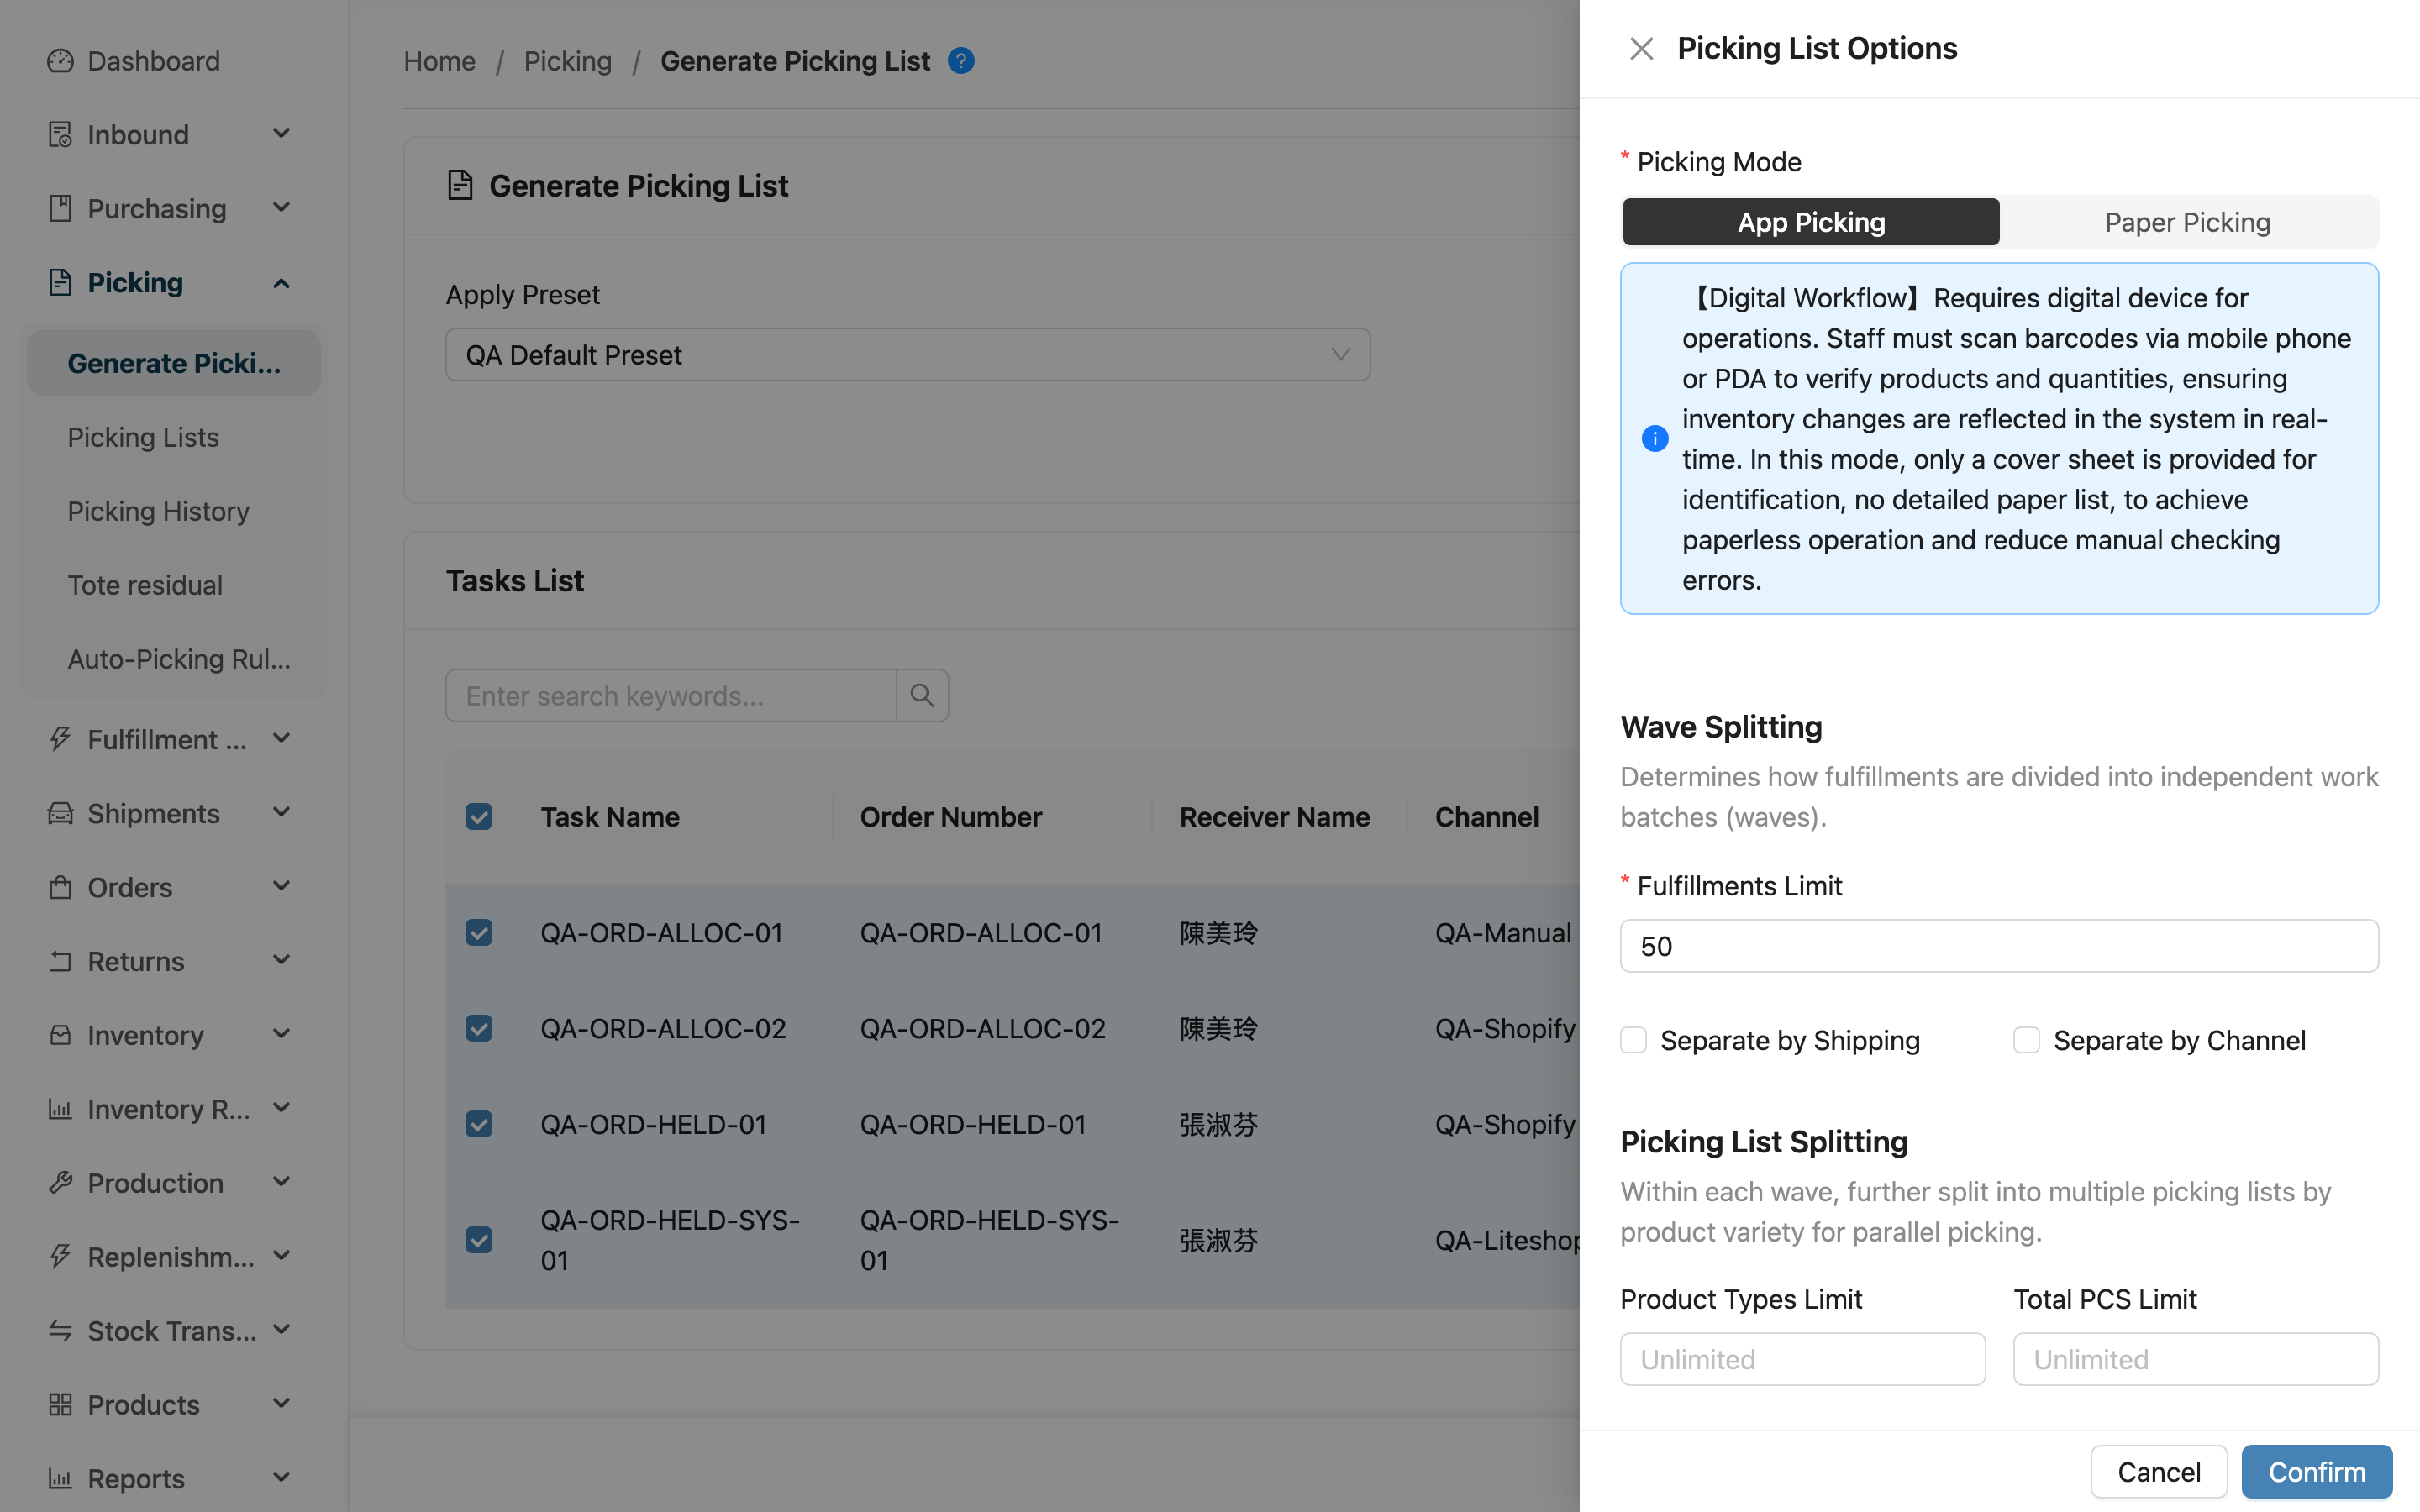
| Picking Method | Best for |
|---|---|
| App Picking | Warehouse staff use a handheld device to scan barcodes while picking; the system records what was picked and how much in real time |
| Paper Picking | Print a paper picking detail sheet; after staff finish picking by paper, they go to Confirm Picking to report the actual quantities |
2.3 Set Wave and Picking List Splitting
In the same settings panel you can decide how this batch of fulfillments is grouped into waves and how many each picking list holds. First group into waves (decide how many fulfillments each wave holds), then split each wave into several picking lists by the quantity limits.
| Setting | Effect | Note |
|---|---|---|
| Fulfillments Limit | The maximum fulfillments a wave can contain; beyond that it is automatically split into multiple waves | Controls the size of a single wave |
| Group into waves by shipping method | Split fulfillments of different carriers into different waves | Keeps the carrier consistent within a wave, easing downstream loading |
| Group into waves by sales channel | Split fulfillments of different sales channels into different waves | — |
| Product Types Limit | The maximum product types per picking list; beyond that it is split into several lists within the same wave | Controls the length of a single sheet |
| Total PCS Limit | The maximum pieces per picking list; beyond that it is split into several lists within the same wave | Controls the weight of a single sheet |
2.4 Apply Filter Template
If you often use the same set of filter conditions, you can apply a filter template at the top of the page to bring in saved filter and split settings with one click, saving you from resetting them each time. This feature belongs to an advanced plan and is not shown when it is not enabled.
2.5 Generate and View Results
After confirming the settings and submitting, the picking lists start generating. Once complete, go to the picking list list to view all the picking lists generated this round; click into any one to start picking or print the paper sheet.
3. FAQ
Quick Navigation: FAQ | Important Notes
3.1 FAQ
▪ Where do I see the generated picking lists?
Go to the picking list list. All the picking lists generated this round are listed there; click in to pick, print, or view the Tote Residual Inventory.
▪ How do I choose between App Picking and Paper Picking?
If staff scan while picking with a handheld device, choose App picking and the system records in real time; if you want to print the details, let staff pick manually, and report afterward, choose paper picking. The differences between the two and the follow-up flow are in 2.2 Choose the Picking Method. The picking method is decided at generation and cannot be changed afterward.
▪ Why can't some fulfillments be filtered out?
Only fulfillments that are "allocated and not yet in another picking list" are pulled out. Fulfillments already in another picking list, already shipped, or already canceled do not appear. Check whether the fulfillment's current status qualifies.
▪ After setting Order Requested Delivery Date, far fewer fulfillments appear. Is something missing?
No. This condition only counts fulfillments whose order actually has a requested delivery date, so two kinds disappear: orders with no requested delivery date (a blank date is not treated as a match), and work orders and stock transfer orders (they have no order, therefore no requested delivery date). This condition has no "all" option — to bring them back, clear the dates and it stops filtering. This differs from Scheduled Shipping Date, which still pulls out fulfillments whose order has no shipping date even when a date is set.
▪ Can Scheduled Shipping Date and Order Requested Delivery Date be used together?
Yes. The two are independent conditions, and when both are set a fulfillment must match both to be pulled out. For example, Scheduled Shipping Date set to Ship Today plus Order Requested Delivery Date set to Tomorrow pulls out the fulfillments that ship today and must arrive tomorrow.
▪ What is the difference between the maximum product types and the maximum quantity?
The maximum product types counts "how many distinct products (SKU)", while the maximum quantity counts "how many pieces in total (PCS)". If either is exceeded, the system splits the picking list into several lists within the same wave. See 2.3 Wave and Split Settings for details.
▪ Can I undo after generating picking lists?
Yes. If a whole list was picked wrong, you can terminate the picking list in the picking list detail; if only certain fulfillments need to be pulled out, go to the picking wave detail to return those fulfillments. The difference and impact of terminating versus returning are explained on the corresponding pages.
▪ Can I still adjust the conditions after applying a template?
Yes. Applying a template just brings in the saved conditions once; after bringing them in, you can still manually add or remove filters or modify the split settings before generating.
3.2 Important Notes
⚠️ Important Reminders
- The Picking Mode is decided at generation and cannot be changed afterward; if chosen wrong, you can only terminate and regenerate.
- A single round can only generate picking lists for one Merchant Name; to pick a different merchant's goods, generate separately.
💡 Tip: During a shipping peak, lowering the maximum product types and quantity per picking list splits out more short lists for several people to pick at once, completing the whole batch faster.
4. Related Features
| Feature | Description | Link |
|---|---|---|
| Picking Lists | View and manage all generated picking lists | Go |
| Auto-Picking Rules | Save frequently used filter and split conditions as a template for repeated use | Go |
| Picking Wave Detail | View all fulfillments in a wave, print, and return | Go |