Inbound Acceptance
Contents
- 1. Scenarios — 3 common scenarios
- 2. Feature Guide — 5 operation checkpoints from finding the order to closing and putaway
- 3. FAQ — 8 FAQs + Important Notes
- 4. Related Features
1. Scenarios
Quick Links: Plan vs. Actual | Split Deliveries | Actual Doesn't Match Plan
Scenario 1: The Truck Arrives — Reconcile Plan Against Actual
Situation: A truck pulls up at the receiving dock, and you have an inbound order saying "Product X, 100 cases." The inbound order represents what the merchant expects to arrive — but how much actually comes off the truck, and whether the batch numbers match, you only know after counting it piece by piece on the spot.
Use this feature: Find the order in Find and Enter the Order to Accept, click "Start Acceptance" to enter the acceptance workflow, and scan each item's barcode to record the quantity, batch, and expiration date you actually received (see Count and Fill Item by Item).
Result: The system maps your "actual" against the "plan" on the order and calculates the difference automatically. No mental math, no separate reconciliation sheet — discrepancies are right there at a glance.
Scenario 2: The Supplier Ships in Batches, One Order Filled Over Time
Situation: The 100 cases on a single inbound order arrive in three trips from the supplier (60 cases first, 30 the next day, then 10). You can't wait for everything to arrive before starting acceptance, but you also don't want three separate orders for the same shipment.
Use this feature: Accept one receipt per trip — a single order supports multiple acceptance rounds (see Resume or Start a New Round). When the second trip arrives, the system asks whether you want to "Continue Verification" or start a new round, and you simply pick up where you left off.
Result: All three trips accumulate on the same inbound order. The system totals every round and continuously compares against the plan, so you always know how many cases are still missing and which round has already been put away.
Scenario 3: The Actual Batch or Quantity Doesn't Match the Plan
Situation: The order says 100 cases, but you only count 95 — and 5 of them have a different batch number than planned. You worry the system might block submission or force you to match the plan before it accepts the goods.
Use this feature: Just enter what you actually received — quantity 95, and the real batch number of the goods in hand (see Count and Fill Item by Item). Whether the actual is more or less than the plan, the system only shows a warning and never blocks submission.
Result: The discrepancy is recorded exactly as is, making it easy to trace later whether the supplier shipped short or sent the wrong batch. Once the inbound completes, stock is booked according to the numbers you accepted — never silently aligned to the planned value. Recording faithfully is critical: once the order is completed, you can no longer edit it; corrections can only go through a stocktake adjustment.
2. Feature Guide
Inbound Acceptance is your daily entry point for receiving: the whole flow is mapping the "actual" off the truck against the "plan" on the inbound order, item by item. An order goes through five operation checkpoints from start to finish: ① find and enter the order to accept → ② (when splitting one order) resume or start a new round → ③ enter the acceptance workspace → ④ count and fill item by item → ⑤ close. After closing, the system puts stock away automatically or you do it with the handheld App, and only then is stock formally booked. The sections below follow this order, each checkpoint with its own screen.
Quick Navigation: ① Find and Enter | ② Resume or New Round | ③ Acceptance Workspace | ④ Count and Fill | ⑤ Close | Putaway After Closing
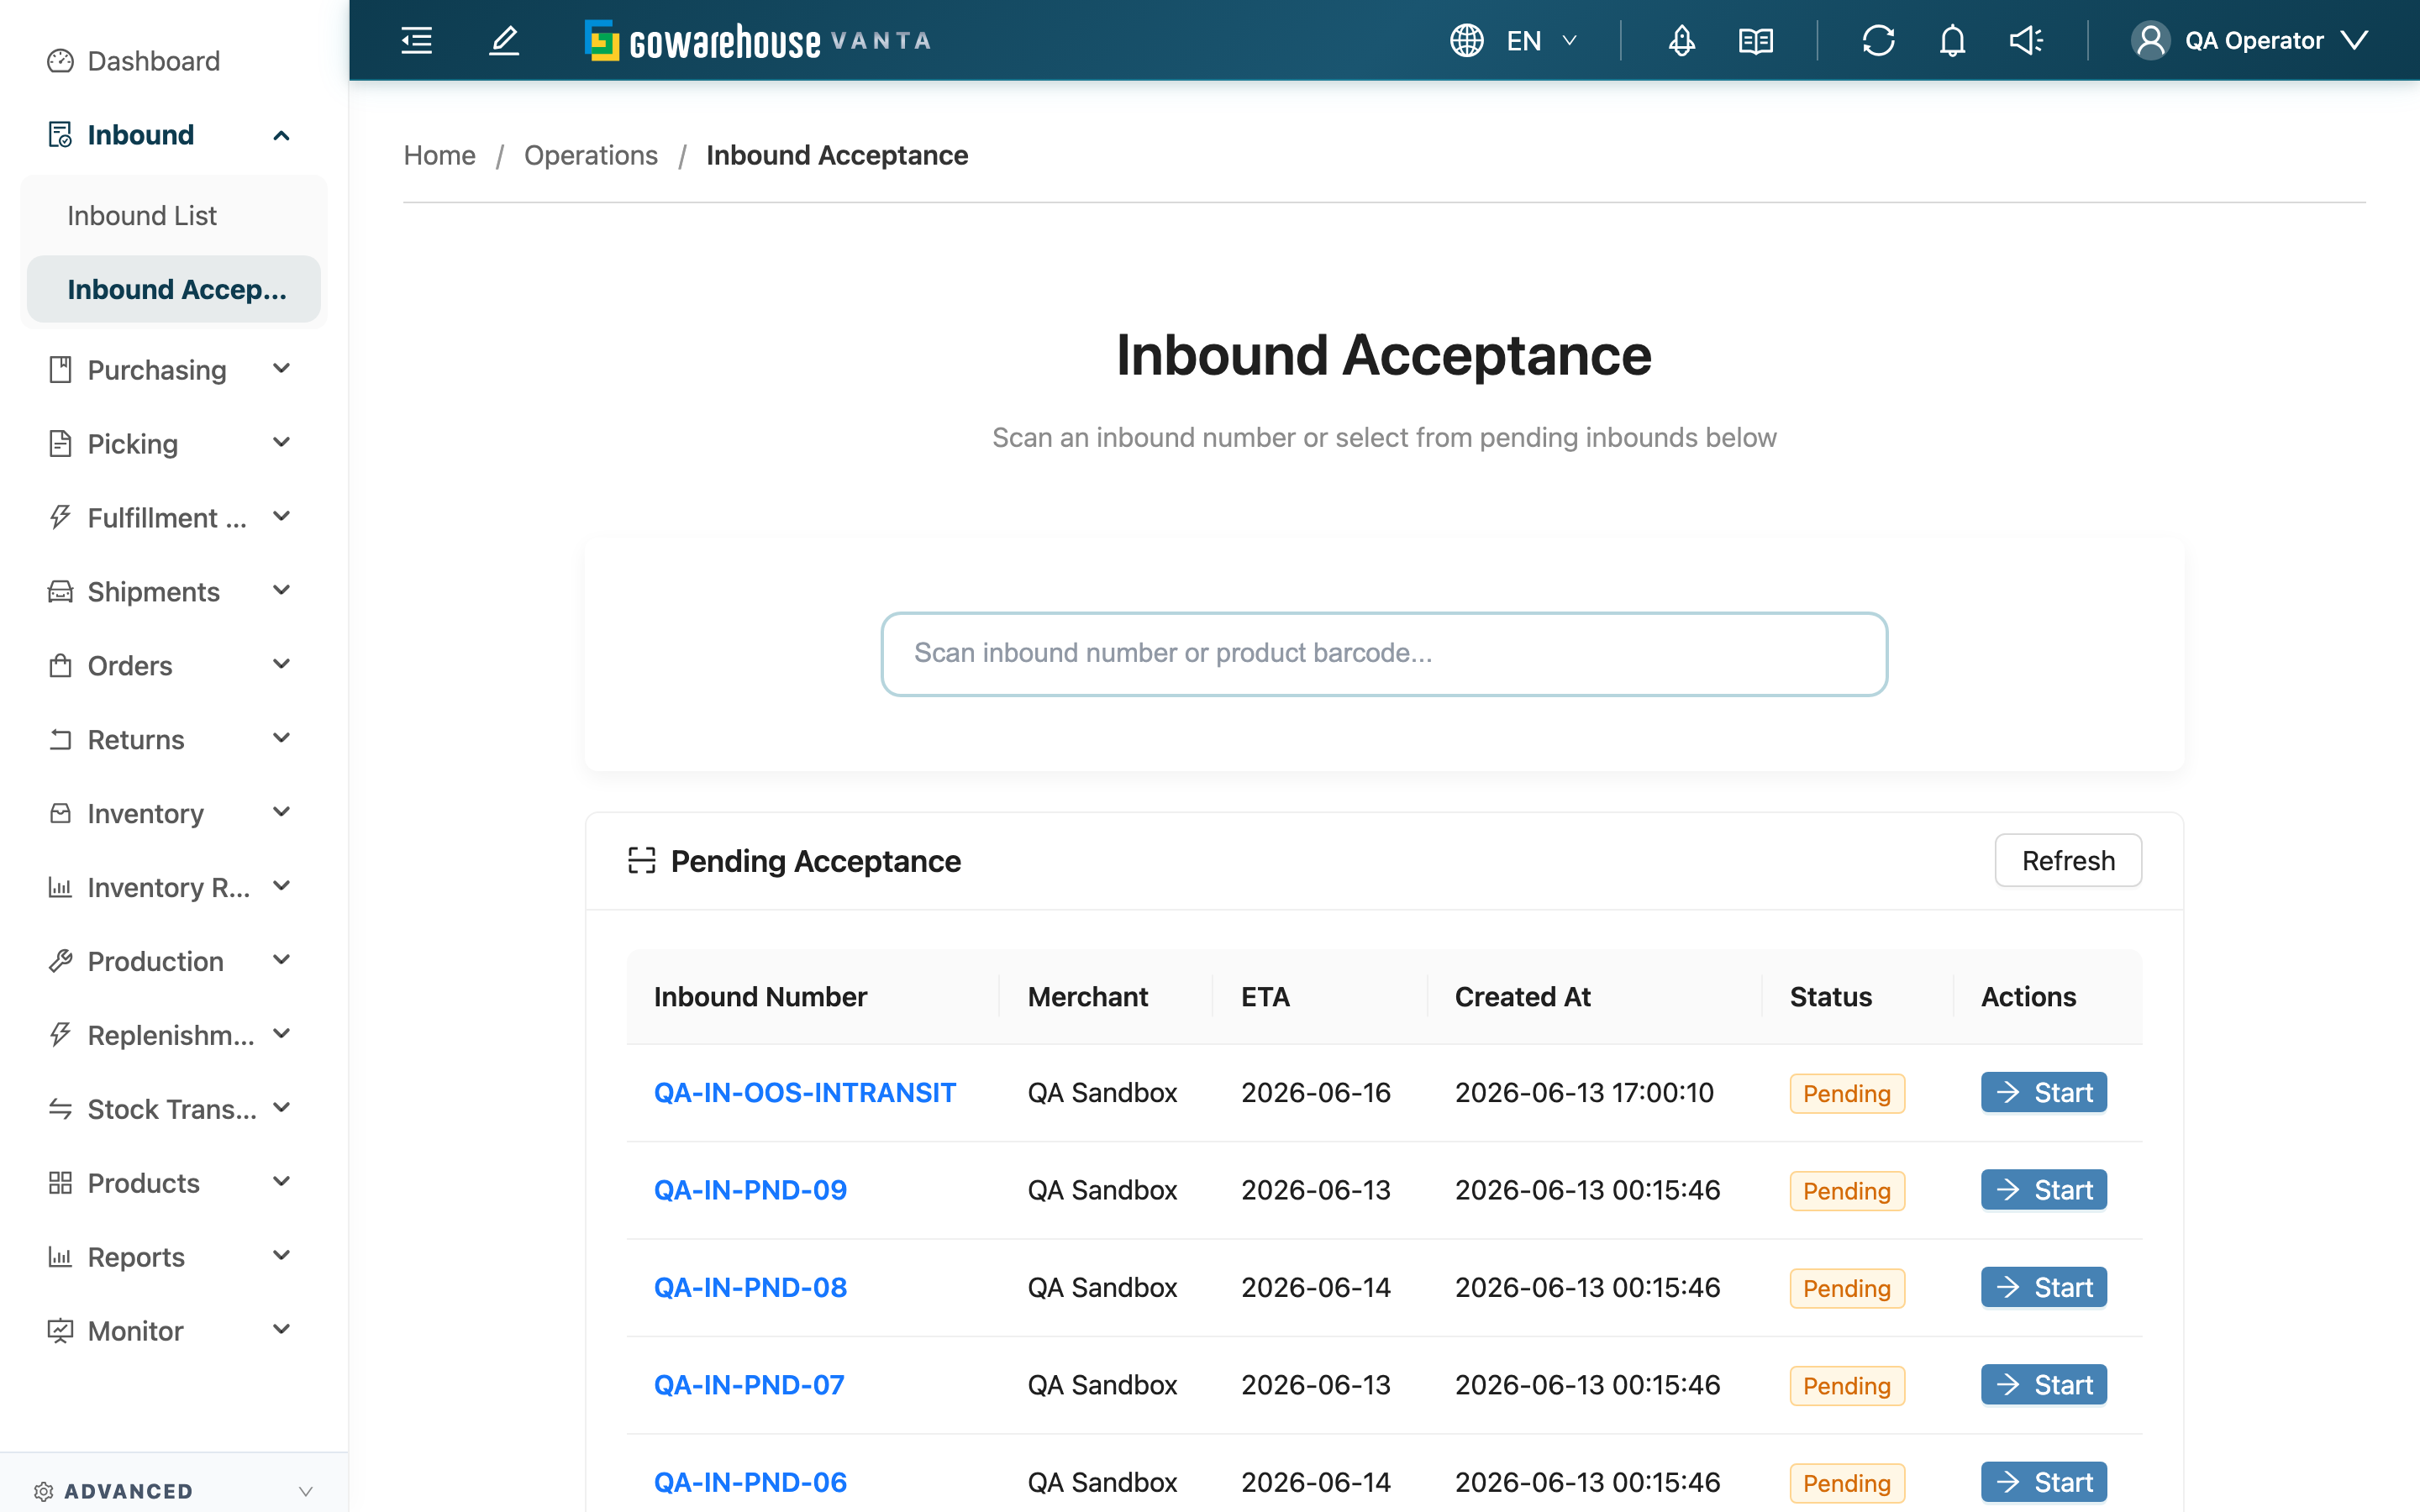
2.1 Checkpoint 1: Find and Enter the Order to Accept
On entering, you see the scan box and the pending list (see the overview above). The scan box accepts an inbound order number or a product barcode, and the list below filters in real time to matching orders — note: scanning only filters the list; it does not jump into acceptance automatically. You still have to click "Start Acceptance" on the target row to enter the acceptance workflow. If nothing matches, the system shows a not-found message.
The list only shows inbound orders with status Pending; orders already in acceptance or completed do not appear here (to see all orders, go to Inbound List). Other than the order number — which opens the details — the remaining columns (Merchant, ETA, Created At, Status) are self-explanatory by name.
2.2 Checkpoint 2: Resume or Start a New Round
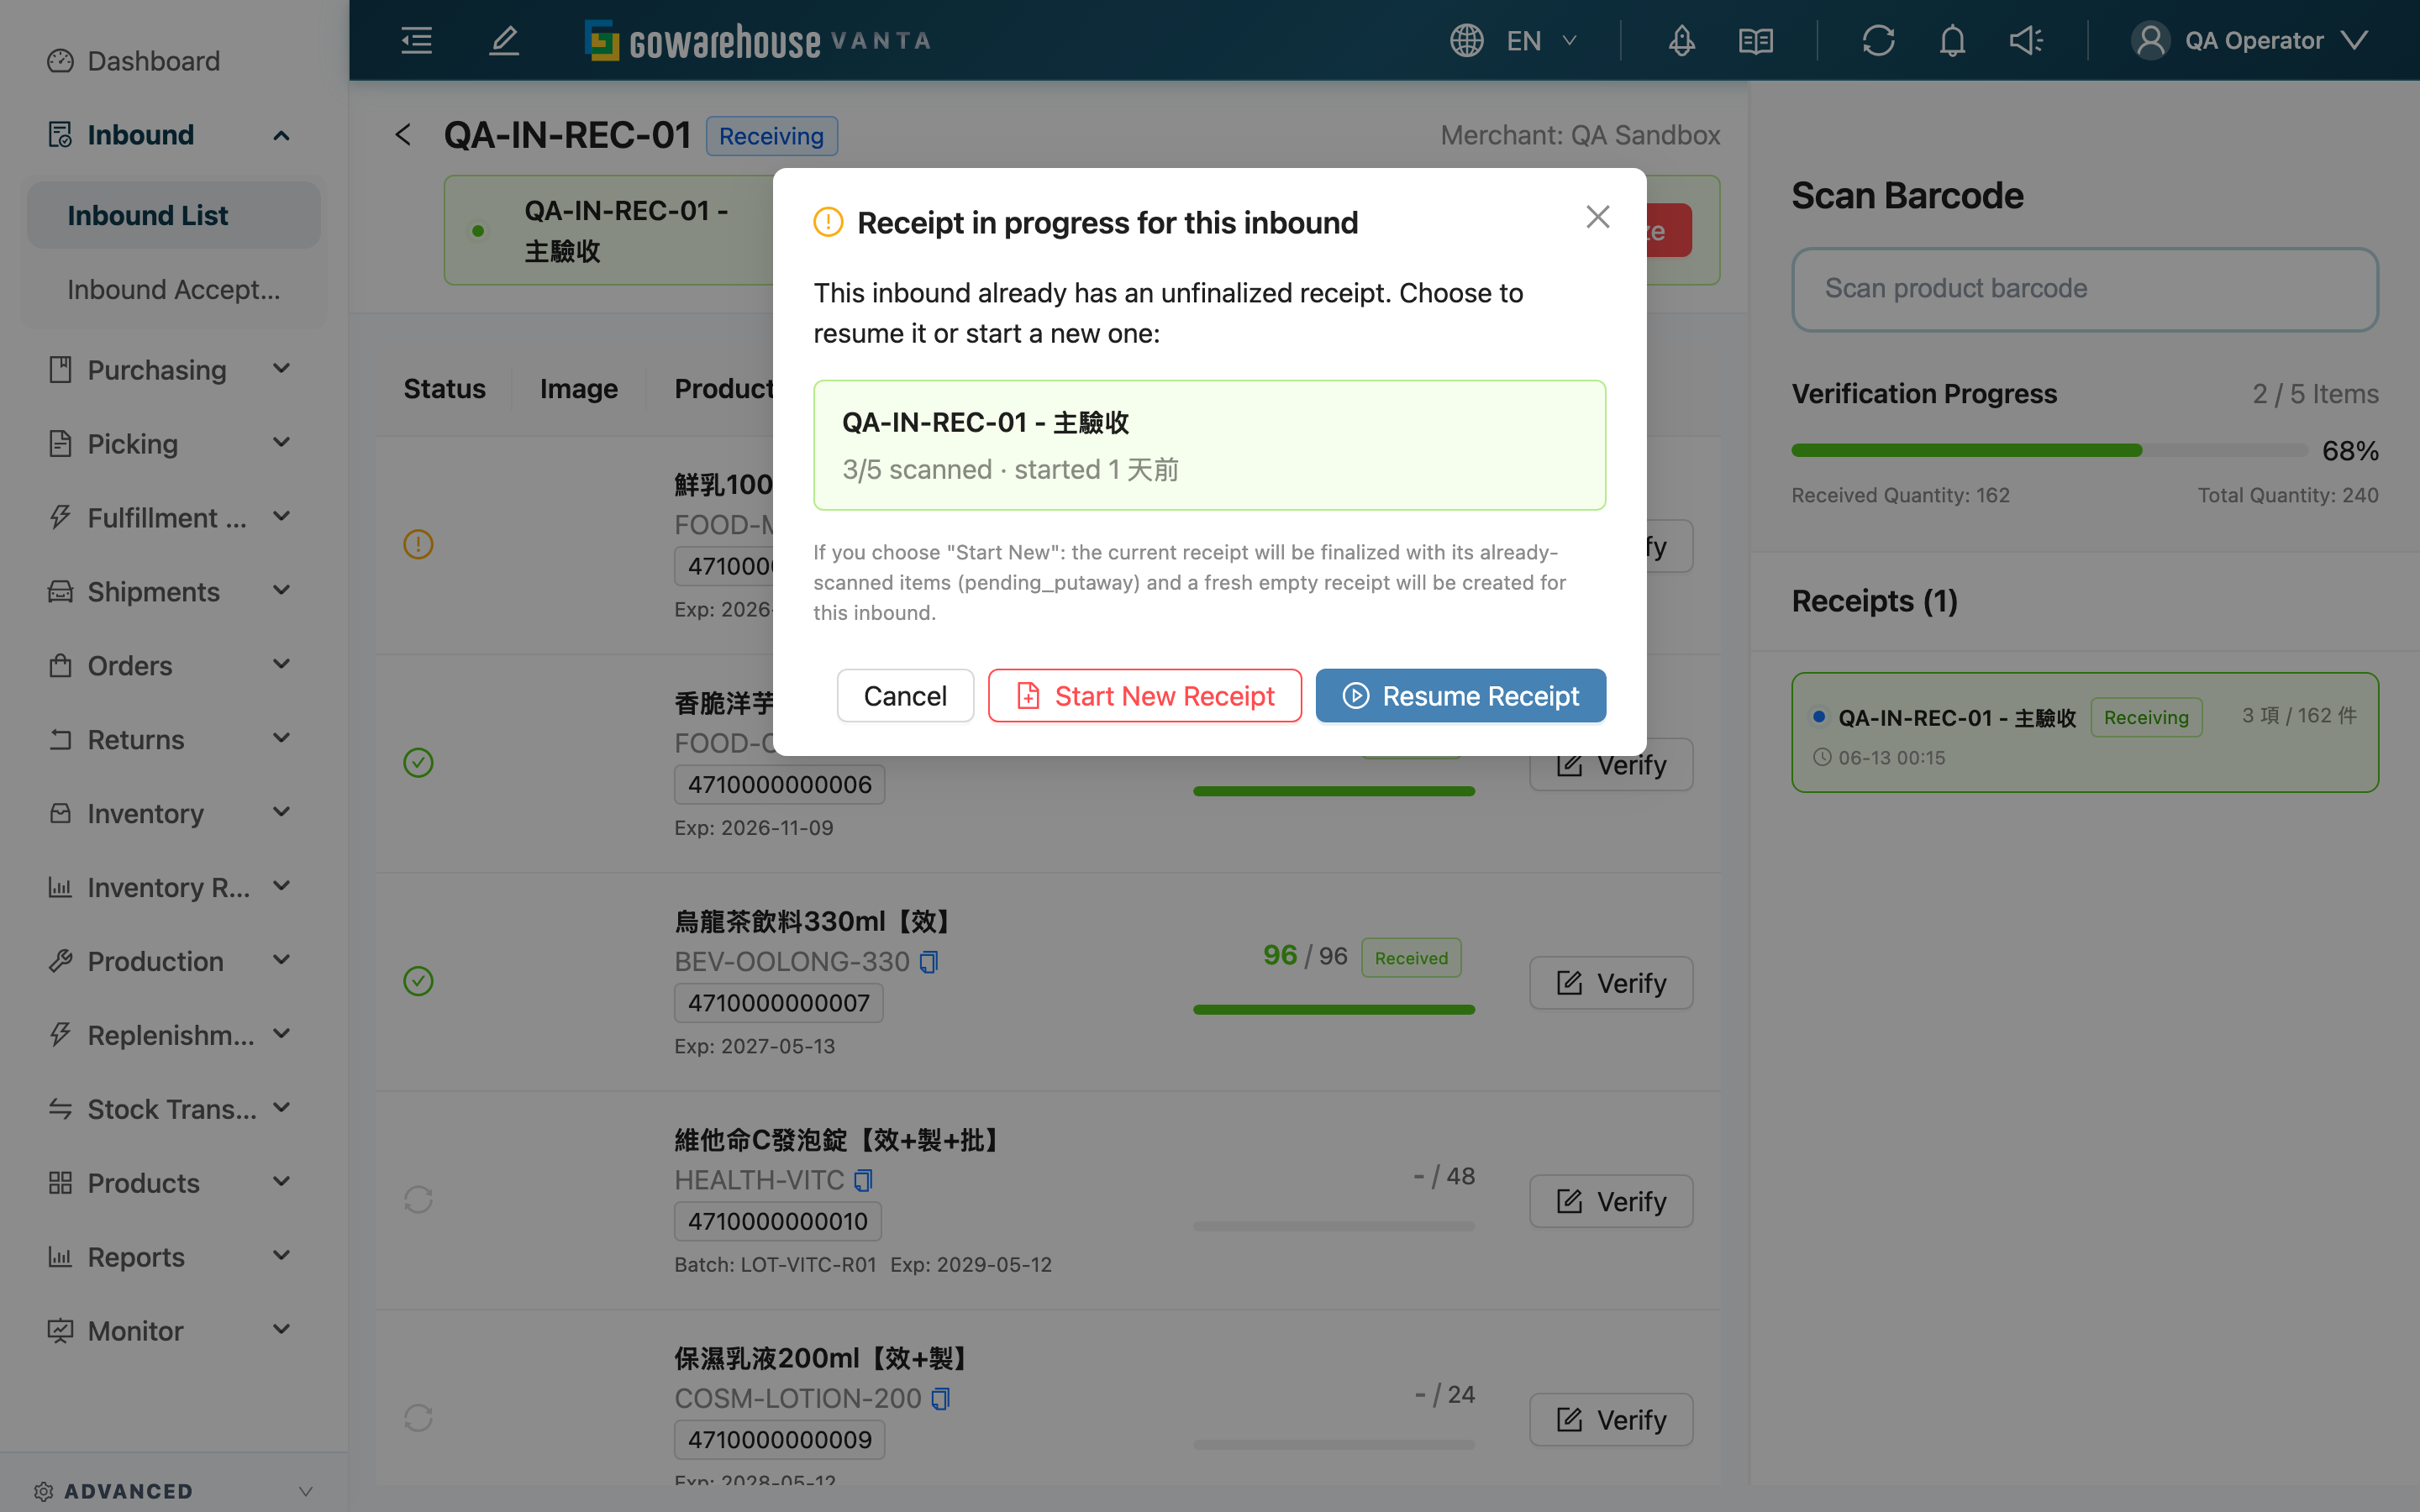
If this order already has a round open that isn't closed yet (supplier split deliveries, or the previous shift didn't finish), this dialog appears first when you enter the acceptance page to ask how you want to take over; it does not appear the first time you accept this order, or when the previous rounds are all closed — you go straight to the workspace. The card shows how many items the old round already scanned and when it started, helping you decide whether to resume or start fresh:
- "Continue Verification": Keep working on that unclosed round; everything you scanned before is still there.
- "Start a New Round": Finalize the old round on the spot with whatever was scanned (moves it to Pending Putaway, awaiting putaway) and open a brand-new empty round to continue. Once you press it the old round is sealed — you can't add to it anymore, so use this only when you genuinely want to account for this trip and the previous one separately.
2.3 Checkpoint 3: The Acceptance Workspace
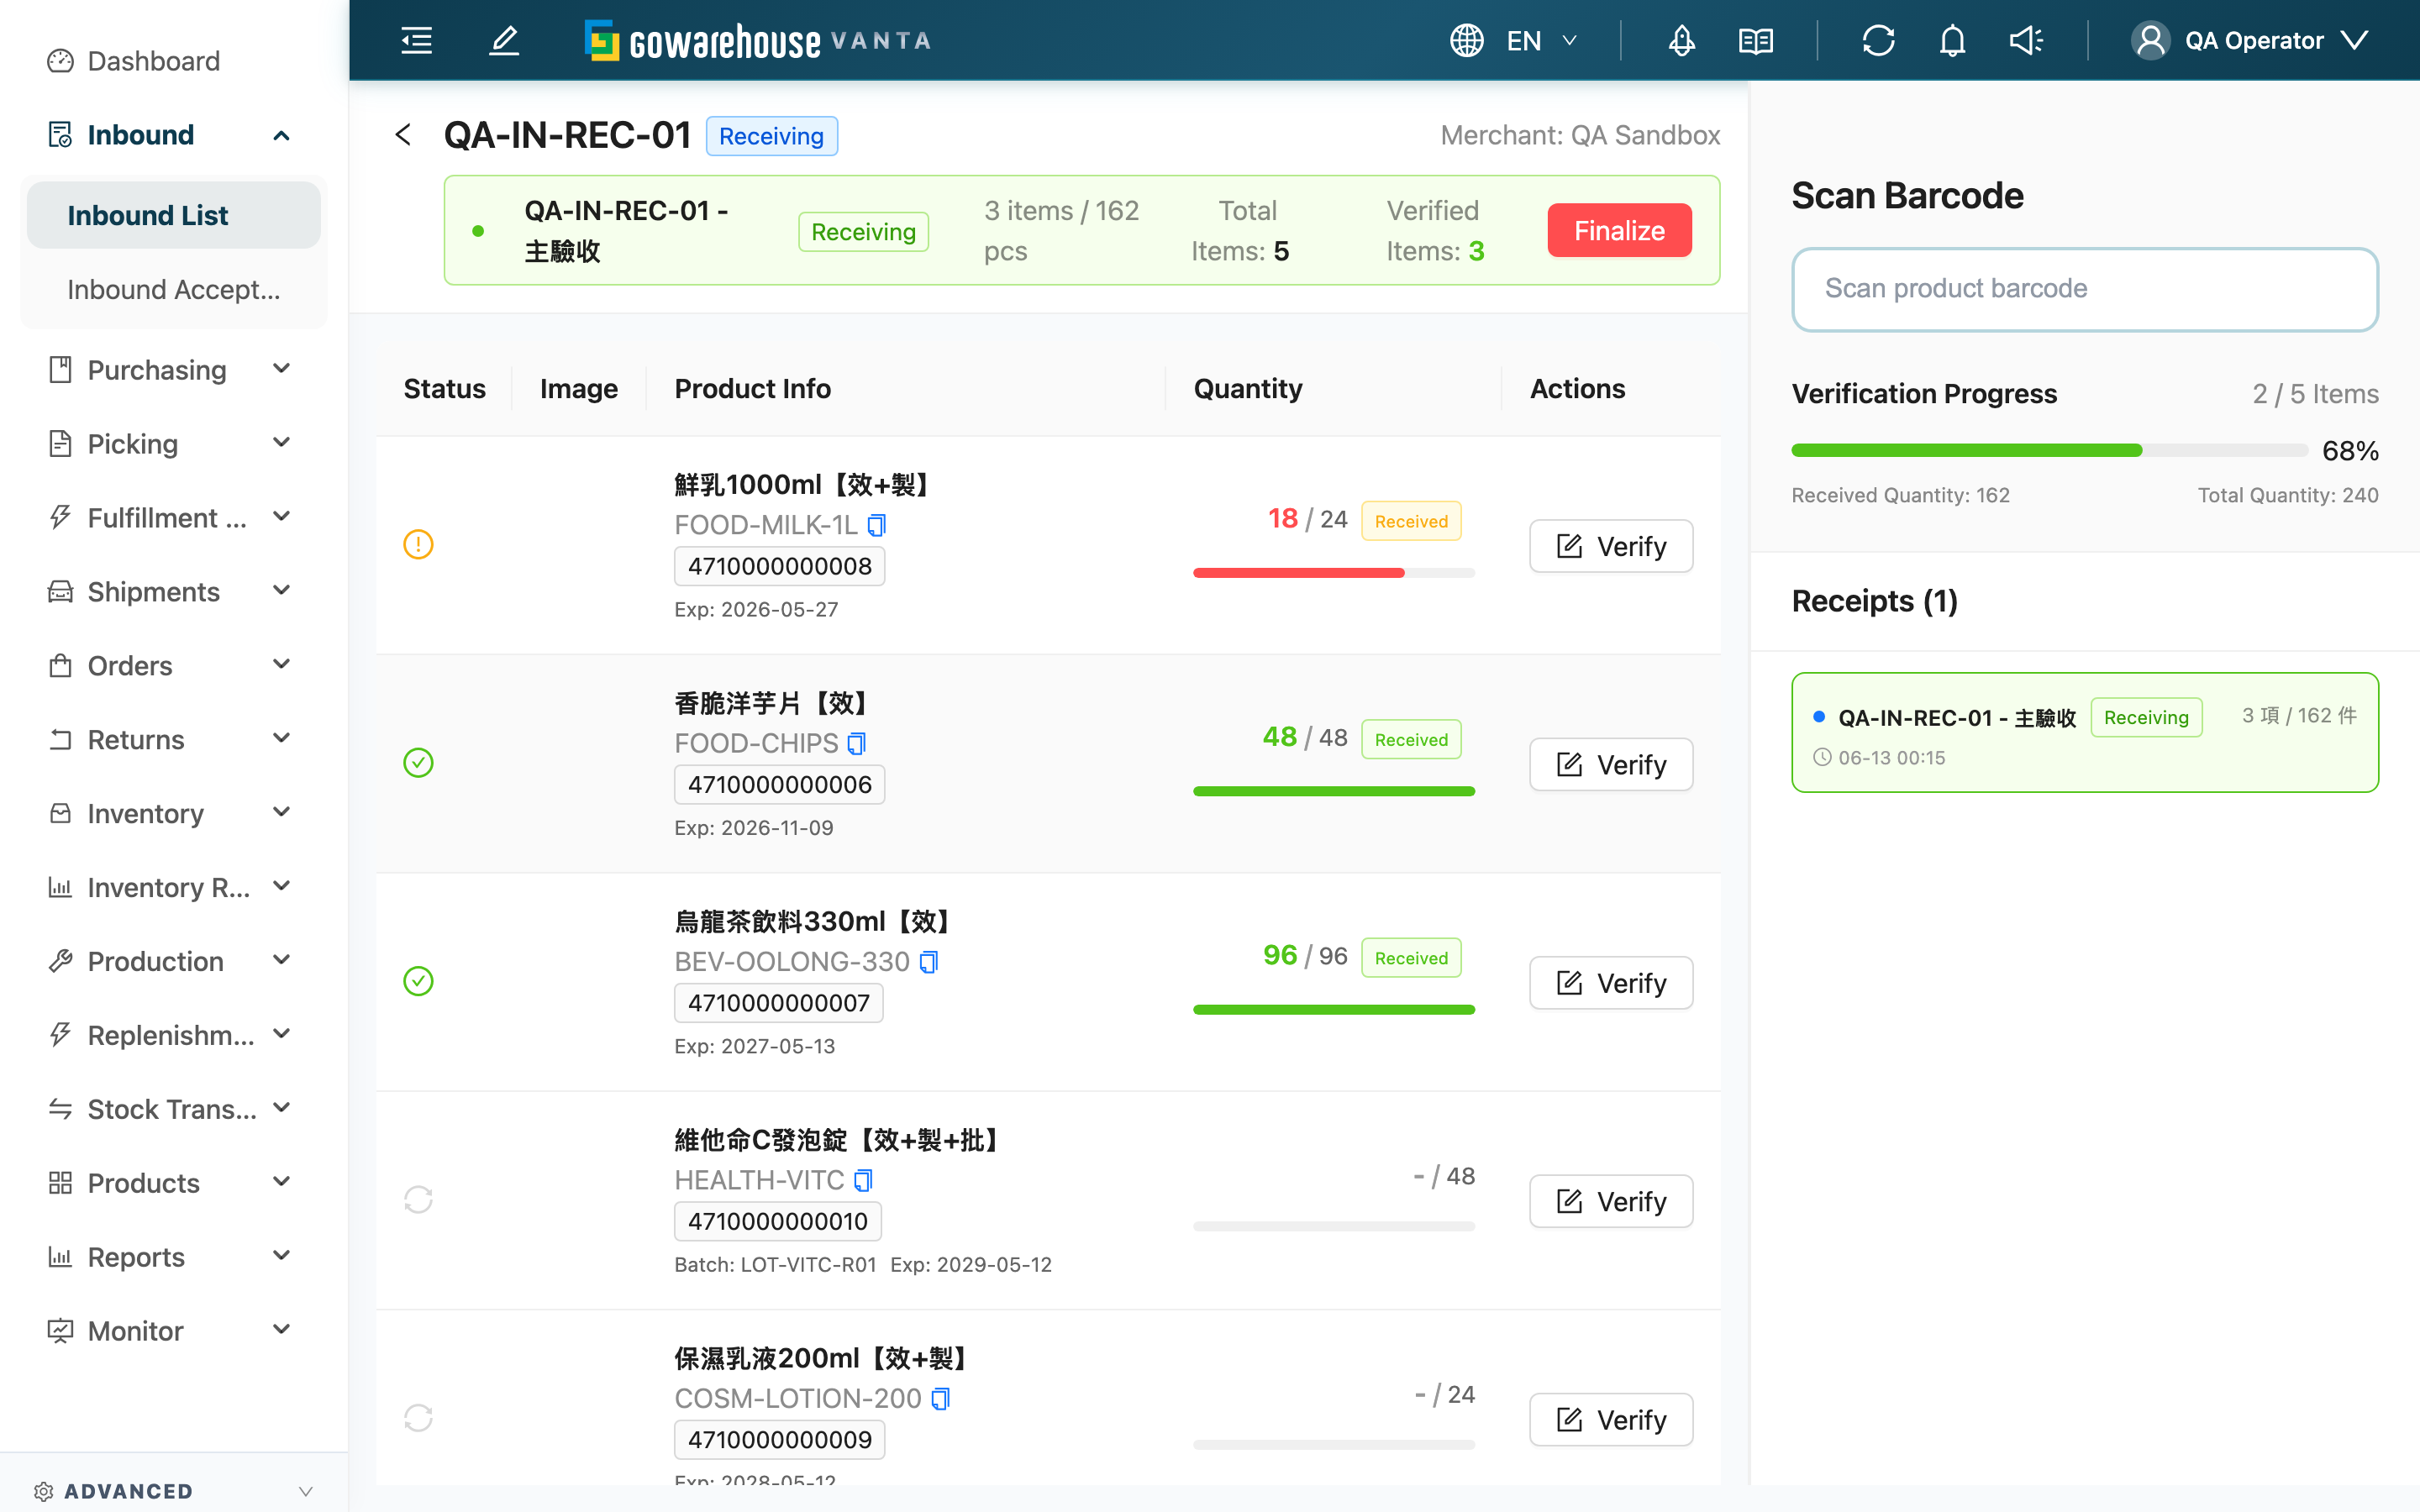
Once inside, the screen splits into three areas where the entire acceptance happens:
- Status bar (top): The order number and status, the current acceptance round (a green background means a round is in progress), the total and accepted item counts, and the "Finalize" button on the right (see Checkpoint 5).
- Item list (middle): One planned item per row. The status icon on the left tells not accepted (gray) / received exactly as planned (green check) / actual differs from plan (amber warning) at a glance; the quantity column shows "actual / plan" with a progress bar, and the "Verify" button is on the far right.
- Scan panel (right): The product-barcode scan box, the order's overall acceptance progress, and the status of each round opened on this order (Receiving / Pending Putaway / Done).
2.4 Checkpoint 4: Count and Fill Item by Item
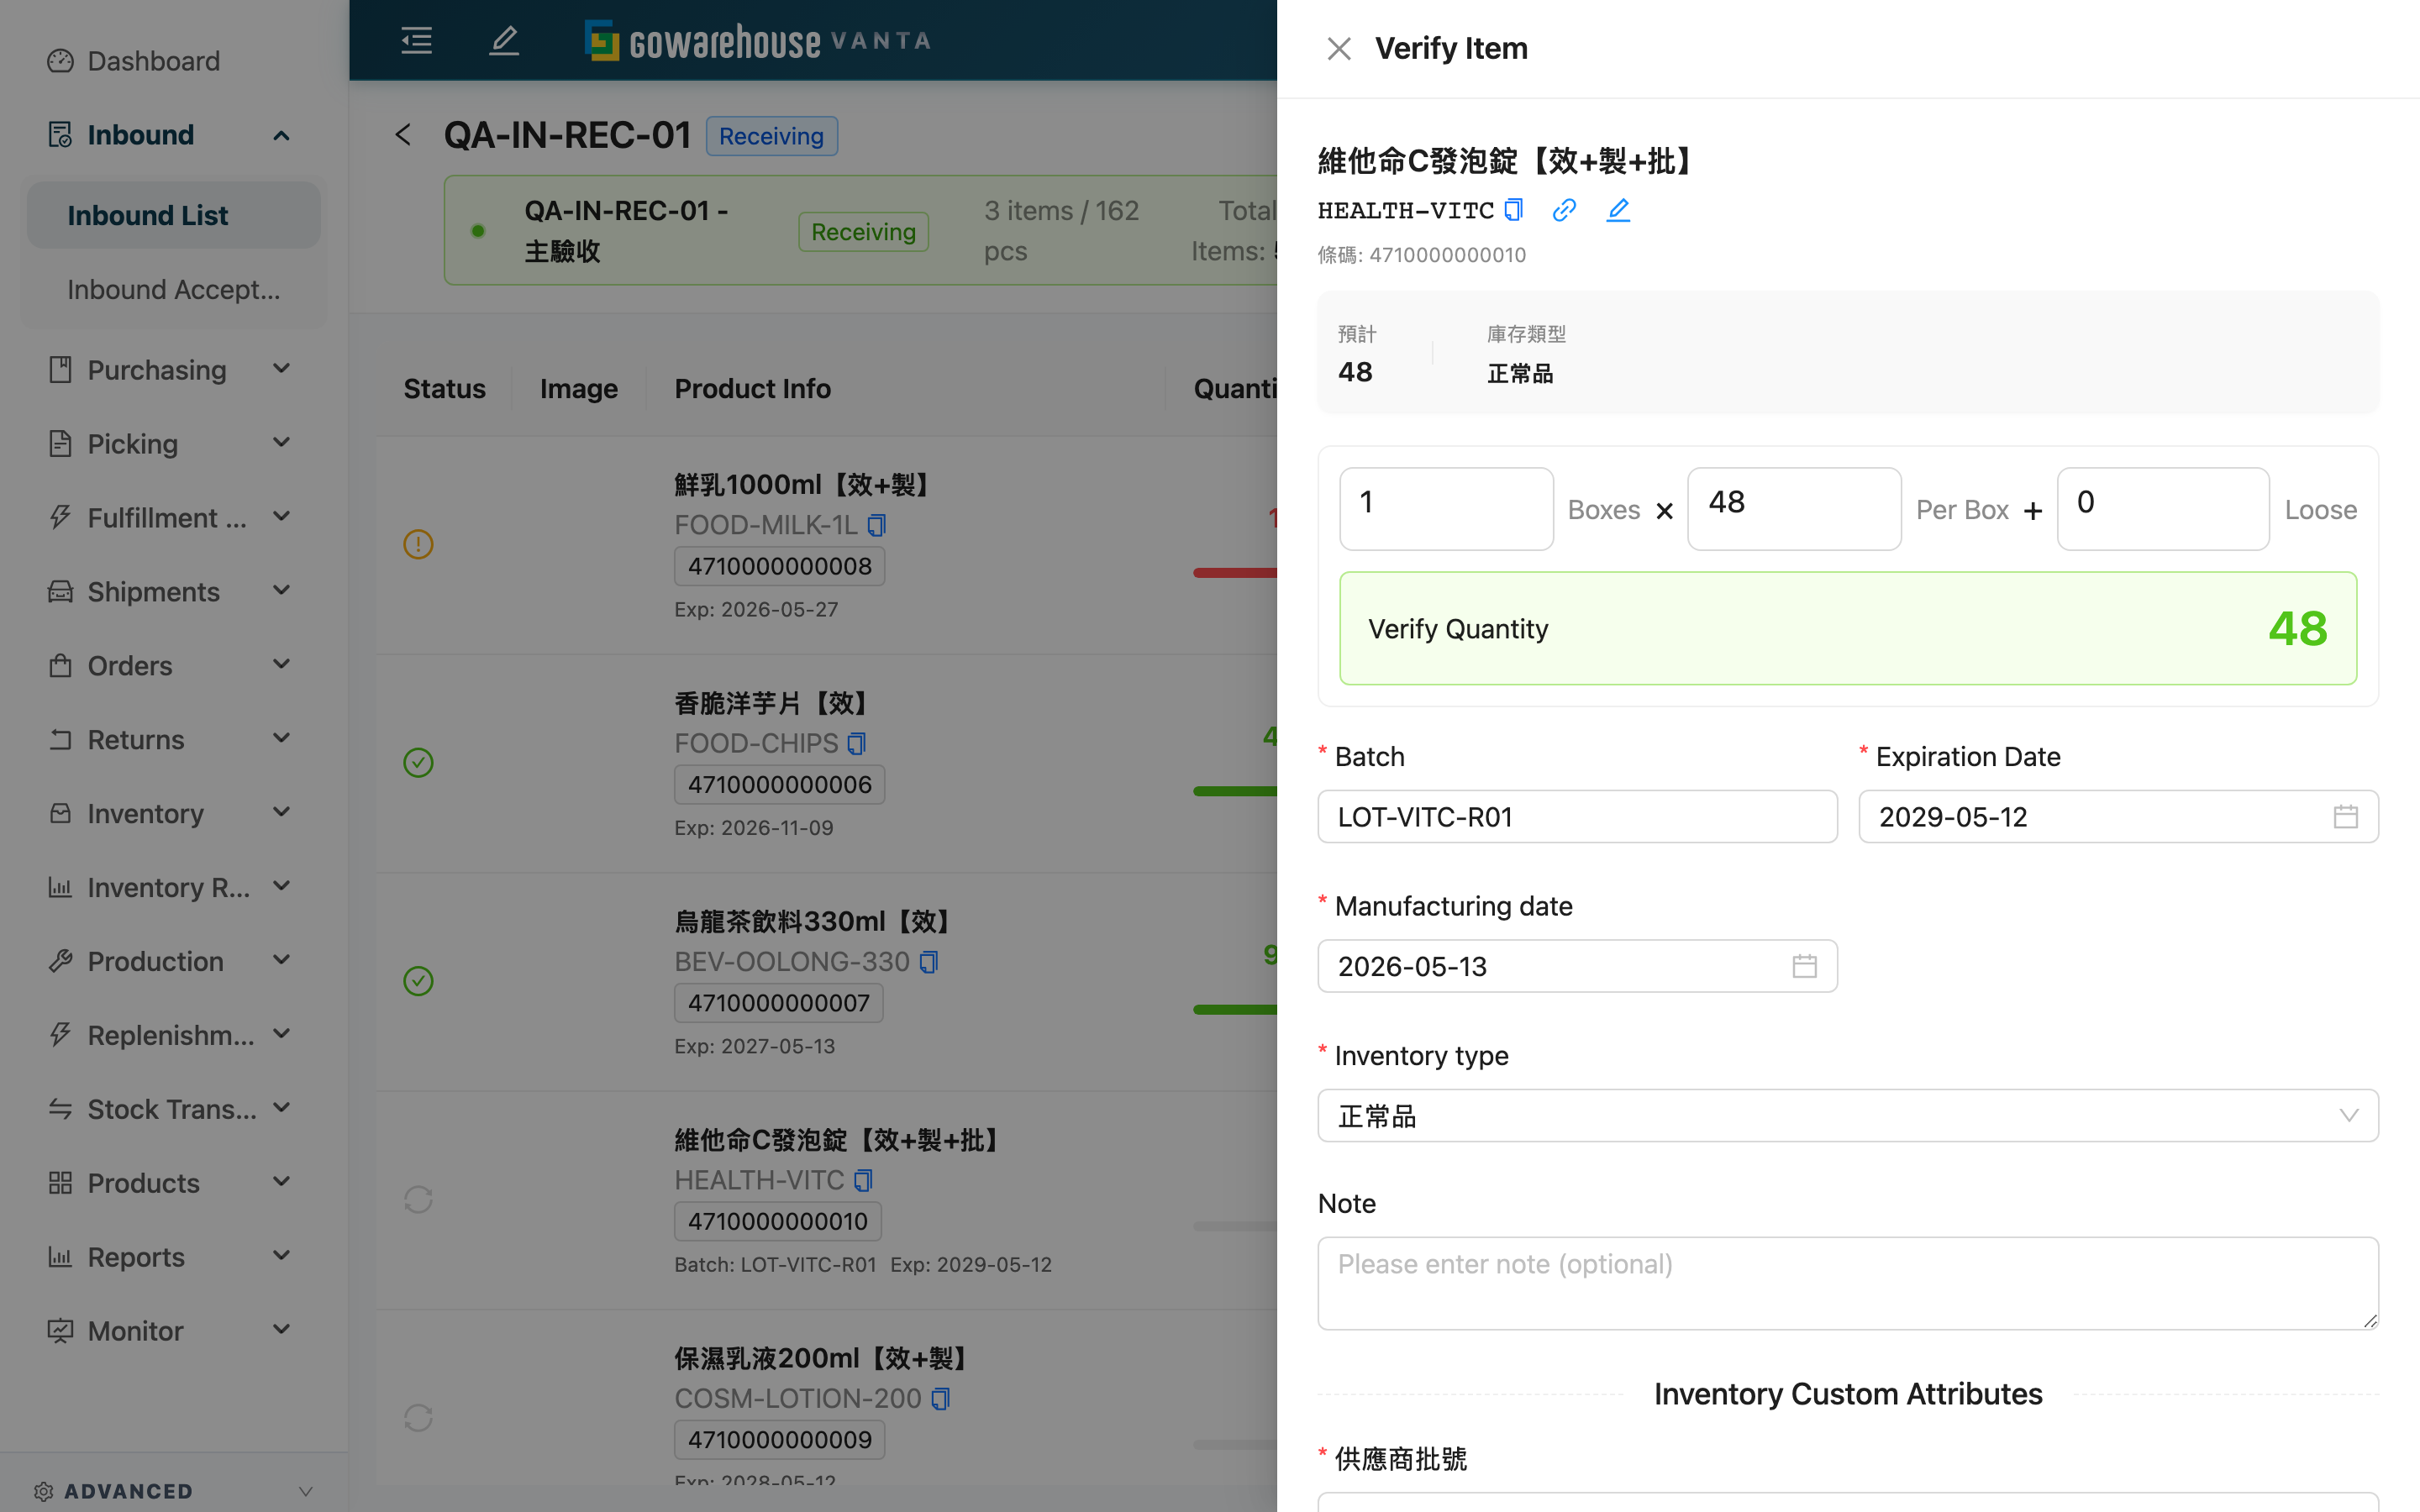
There are two ways in: scan a product barcode on the right panel, or click "Verify" on a row in the middle list. Scanning an item that's on the order opens the acceptance drawer directly; if the scanned product isn't on this order at all, the system turns into a search and you can choose "Add and Accept" to take it in as an Unplanned item. A barcode that doesn't match also turns into a search, showing candidates to pick from.
The top of the drawer shows the product and the planned quantity. The accepted quantity uses multi-unit input — cases × units + loose — and the system pre-splits it from the remaining quantity and units per case (e.g. 48 remaining, 48 per case → 1 case + 0 loose); the accepted quantity totals live as you adjust. The lower half holds the other fields:
Fields marked with * are required. Whether a field is required depends on the product settings; leaving it blank blocks submission.
| Field | How to Fill | Notes |
|---|---|---|
| Inventory Type | Select which inventory type to record this batch as | Required |
| *Batch | Enter the actual batch number of these goods | Required when the product is set to "batch required" |
| *Expiration Date | Enter the actual expiration date | Required when the product's shelf-life days is greater than 0 |
| *Manufacturing Date | Enter the actual manufacturing date | Required when the product is set to "manufacturing date required" |
| Serial Number | Scan each serial number individually | Appears only when the product requires serial numbers and the merchant policy allows capturing them at the inbound stage |
| Note | Enter a note for this batch | Optional |
When done, click "Confirm" to submit. Receiving more or less than planned only shows a warning and never blocks submission — just enter what you actually received; the system keeps the discrepancy for later comparison.
Reopening an item you've already accepted first asks whether you want to "Add Batch" (receive another round of the same item) or "Edit Receipt" (change the earlier round's numbers) — but items already put away can no longer be corrected.
2.5 Checkpoint 5: Close This Round / the Whole Order
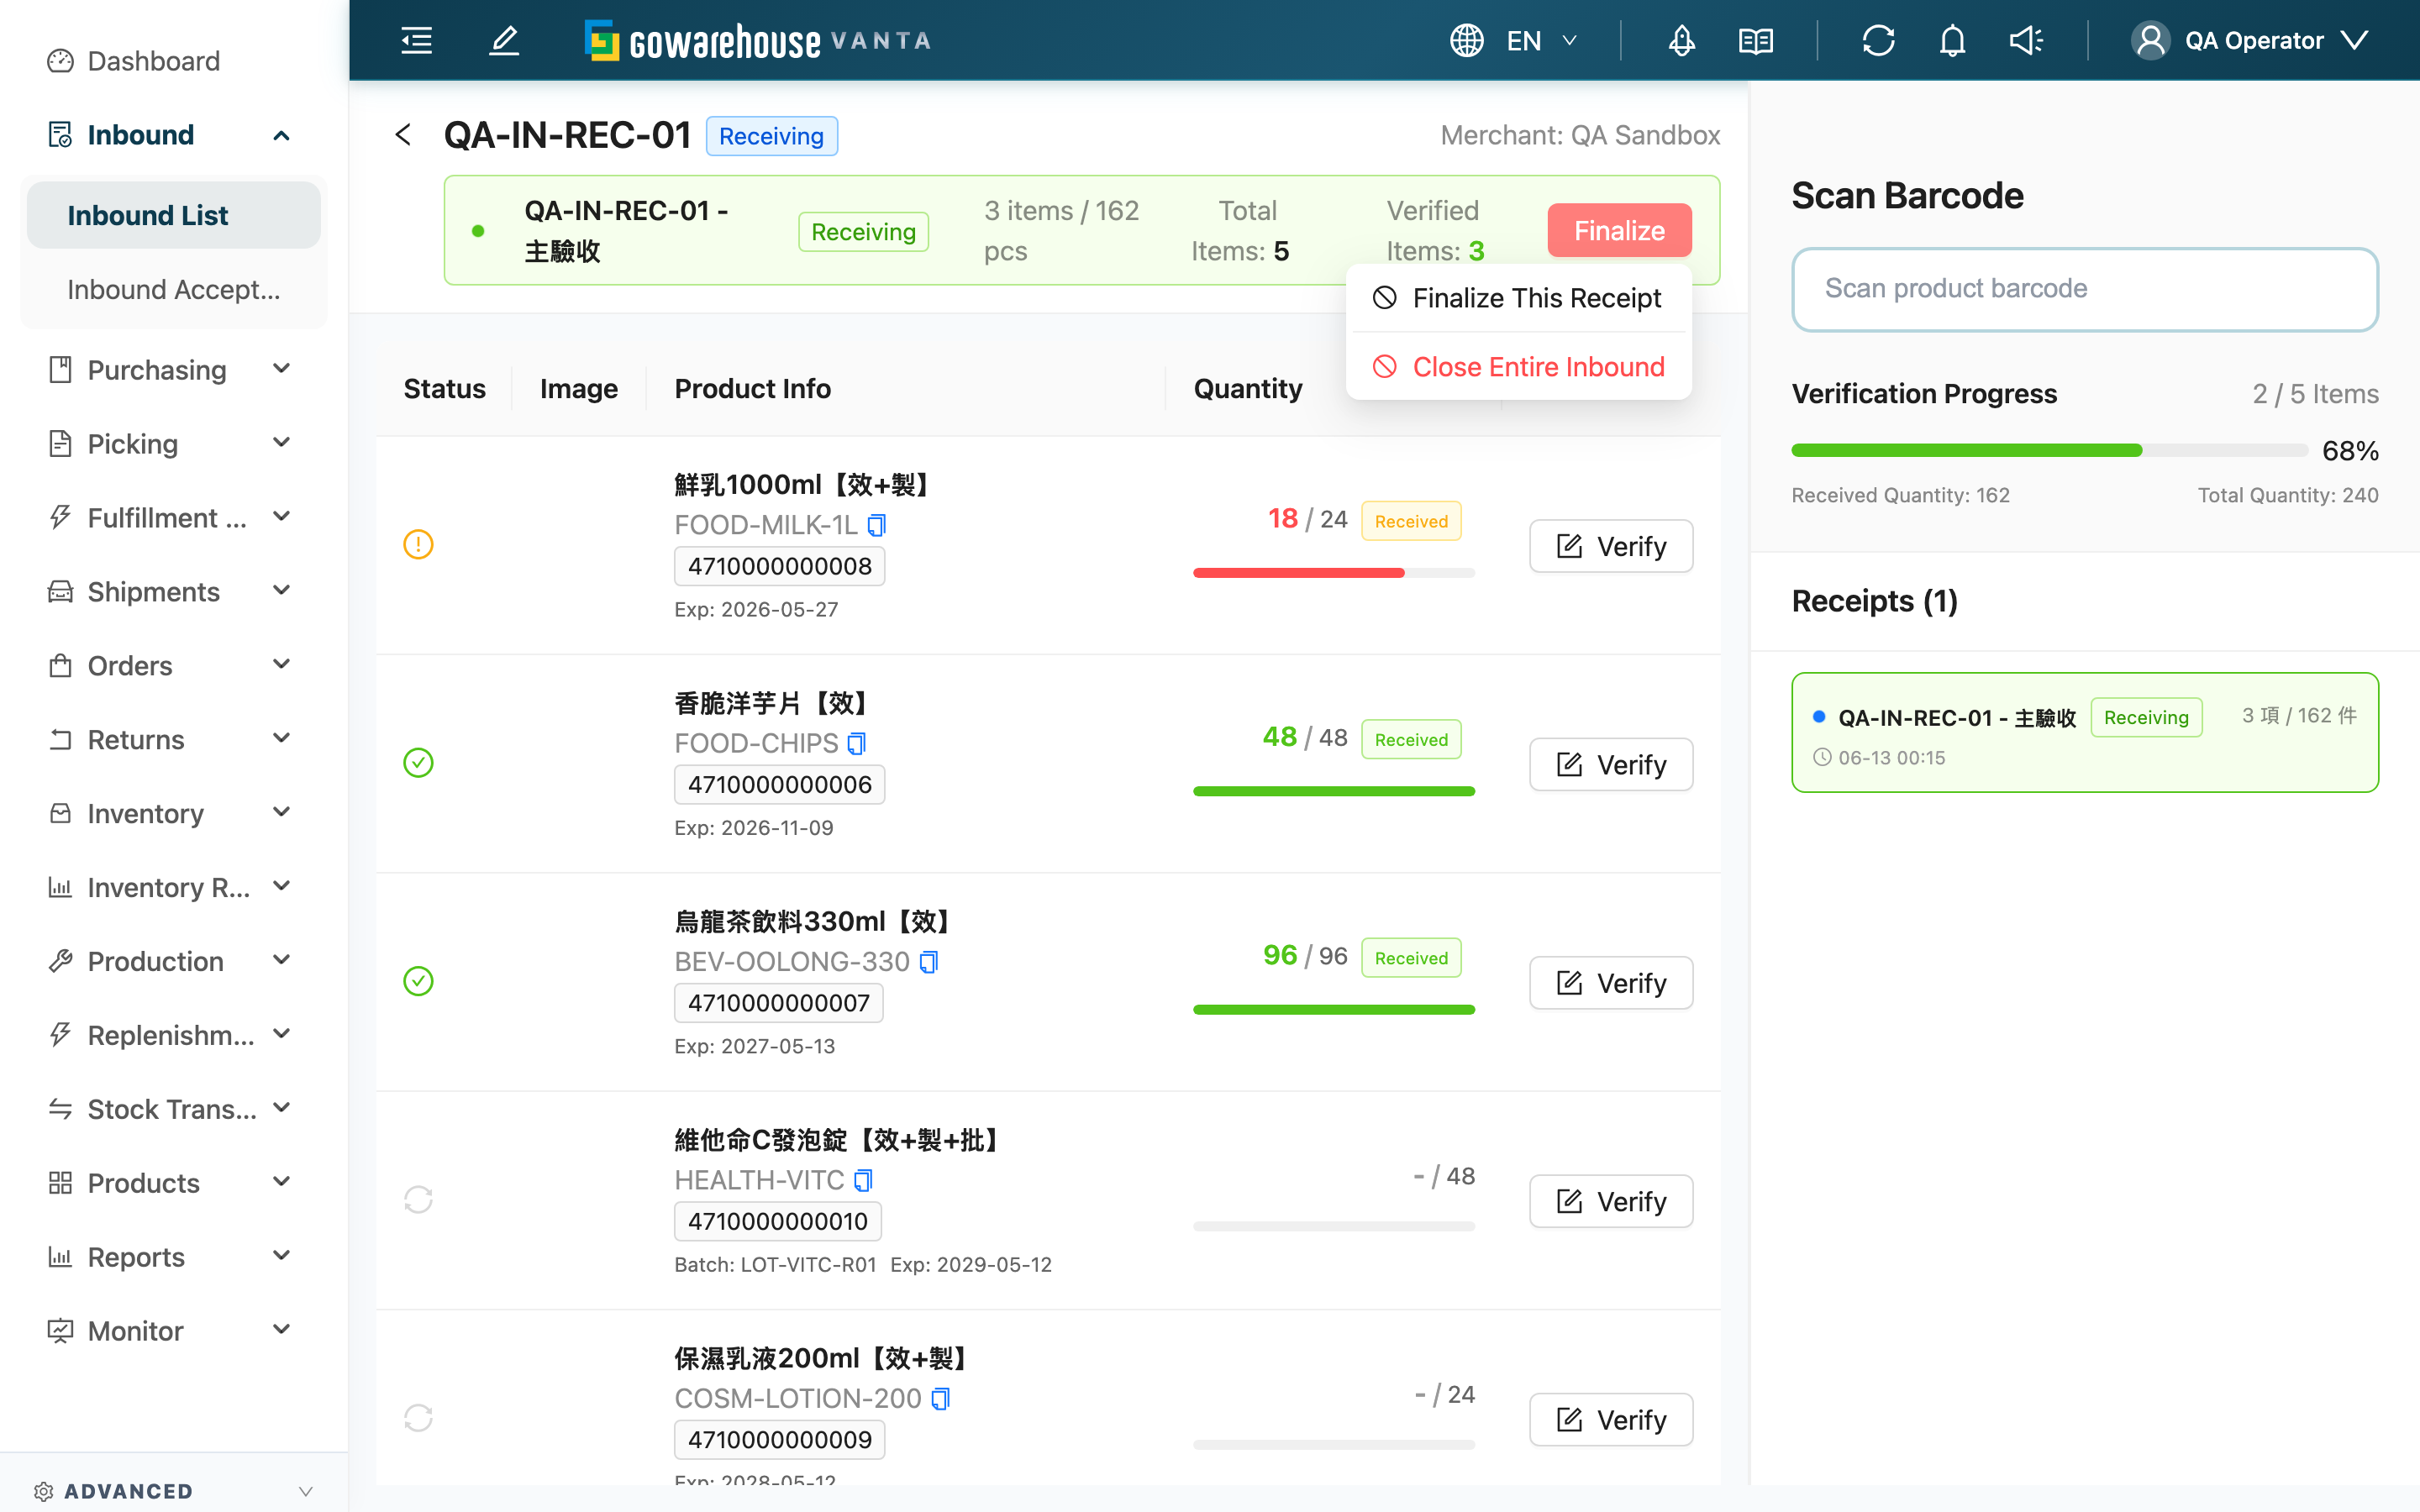
Once you've received a segment, close it via the "Finalize" dropdown at the top, choosing by the situation:
| Action | When to Use | What It Does | Reversibility |
|---|---|---|---|
| Finalize This Receipt | This trip's goods are received but the whole order isn't yet complete | Turns this round to Pending Putaway, awaiting putaway; the inbound order stays at Receiving, so you can open new rounds for the rest | The round can still be corrected before putaway |
| Close Entire Inbound | All planned items are fully received and the order is wrapping up | Closes this round and turns the whole order to Received, advancing to putaway | Can still revert to Receiving for correction before putaway |
When all planned items are fully received, the system actively shows a completion prompt letting you choose "Finalize This Receipt" or "Continue Verification".
Separately, when this order has no round in progress, the status bar shows a "Close Inbound Early" button instead — used when you're sure the rest won't arrive (short shipment): pressing it auto-fills unaccepted items to 0 and closes acceptance for the whole order, which no longer accepts acceptance afterward.
2.6 Putaway After Closing
Acceptance only "records what was actually received" — stock has not entered inventory at this point. Stock is created in the "putaway" step. How putaway happens depends on this warehouse's settings for the merchant:
| Warehouse Mode | Putaway Method |
|---|---|
| Virtual Warehouse | Auto putaway after the receipt closes; no extra action needed |
| Fixed Location | Each product has a dedicated location; automatically placed there after the receipt closes |
| Dynamic Location | Goods go to a staging area first; complete putaway using the handheld App by scanning the product + the location (the system suggests a location, or you can pick your own) |
Putaway is a separate flow. Once all items are put away, the inbound order turns to Completed and stock is formally booked — at which point you can find the goods in Stock Inquiry and picking can use this stock. Once the order is completed, you can no longer edit it; corrections can only go through a stocktake adjustment.
3. FAQ
Quick Navigation: FAQ | Important Notes
3.1 FAQ
▪ What if the actual is more or less than the plan?
Just enter the quantity you actually received. Receiving more or less than planned only triggers a warning and never blocks submission (see Count and Fill Item by Item). The discrepancy is recorded exactly as is for later comparison; stock is ultimately booked by the numbers you accepted, not auto-aligned to the planned value.
▪ The goods arrive over several trips — how do I accept them?
A single inbound order can be accepted in multiple rounds. Accept one round per trip; on the next trip, click "Continue Verification" to pick up where you left off, or start a new round (see Resume or Start a New Round). The system totals each round and continuously compares against the plan.
▪ What if I scan a product that isn't on this order?
When a scan doesn't match a product on the order, the system turns into a search. If the item genuinely should be received, choose "Add and Accept" to take it in as an Unplanned (unplanned) item on this order (see Count and Fill Item by Item).
▪ I scanned the inbound order number — why didn't it go straight into acceptance?
The scan box at the top only filters the pending list below; it does not jump into acceptance. After scanning, you still have to click "Start Acceptance" on the target row to enter the acceptance workflow (see Find and Enter the Order to Accept).
▪ What's the difference between "Finalize This Receipt", "Close Entire Inbound", and "Close Inbound Early"?
The difference is the scope and timing: "Finalize This Receipt" closes only this trip and the order can keep receiving; "Close Entire Inbound" wraps up the whole order after the plan is fully received, turning it to Received; "Close Inbound Early" applies when there's no round in progress and you're sure the rest won't arrive — it closes the order with unaccepted items auto-filled to 0. The conditions and reversibility of all three are in Close This Round / the Whole Order.
▪ Where do the goods go after acceptance, and when are they put away?
Acceptance only records what was actually received; stock isn't in inventory yet. Putaway depends on the warehouse mode: virtual warehouses and fixed locations put away automatically, while dynamic locations require the handheld App to scan the product + location (see Putaway After Closing). Stock is formally booked only after putaway completes.
▪ I entered the wrong quantity — can I still change it?
You can before putaway: already-accepted items can be "Edit Receipt" to adjust the numbers (see Count and Fill Item by Item), and the whole order can revert to Receiving for correction before putaway. But items already put away cannot be corrected, and once the order is completed it can't be changed either — corrections then can only go through a stocktake adjustment.
▪ The pending list shows no data?
This means there are currently no inbound orders with status Pending waiting for your acceptance. Orders already in acceptance or completed do not appear here. To see all inbound orders, go to Inbound List.
3.2 Important Notes
⚠️ Reminders
- Once an inbound order is completed (Completed), it can no longer be edited; corrections can only go through a stocktake adjustment — so always record faithfully during acceptance.
- "Start a New Round" seals the currently unclosed round on the spot with whatever was scanned, and you can't receive more into it afterward (see Resume or Start a New Round).
- "Close Inbound Early" auto-fills unaccepted items to 0 and closes acceptance; the remaining goods will no longer be accepted afterward, so use it only when you're sure they truly won't arrive.
- Items already put away can no longer be "Edit Receipt".
- If a product is set with required batch / manufacturing date / expiration date, it's blocked and requested only when you submit that item, not on entry.
💡 Tip: Besides the inbound order number, the scan box can also scan a product barcode to filter pending orders containing that product. For dynamic-location warehouses, putaway happens in the handheld App; after closing on the Web side, the "Manual Putaway" entry appears on the details page.
4. Related Features
| Feature | Description | Link |
|---|---|---|
| Inbound List | View all inbound orders (including in-acceptance and completed) | Go |
| Inbound Details | View a single order's acceptance items, receipt rounds, and putaway records | Go |
| Inbound Dashboard | Track acceptance and putaway progress across all inbound orders on a board | Go |
| Inventory List | Find formally booked stock here after inbound completes | Go |