
Distribution
Table of Contents
1. Use Cases
Quick links: Sorting after wave picking | Scanning an item that isn't in the wave
Case 1: Wave picking is done — sort the mixed items back into each order
Situation: On the morning shift you picked the items for twenty-odd orders in a single wave, all mixed together in one picking tote and wheeled back to the packing area. Now every item has to go back to the order it belongs to before you can pack and ship.
Use this feature: Scan the wave barcode to load the batch of orders into the Distribution Area, where each slot represents one order; then scan items one by one — the system announces the slot number and you drop each item into the matching slot (see Load a wave and start distributing).
Result: Each order's items collect into their own slot; a slot turning green means that order is fully distributed and ready to pack.
Case 2: Scanning an item that shouldn't be here
Situation: Halfway through sorting you scan an item and the system sounds an alert telling you it's an exception item — it might be left over from the previous batch, or over-picked or mis-picked earlier. It simply isn't in this wave.
Use this feature: No setup needed — the system automatically records the item in the Exception Zone tab and the count on the tab goes up by one; it doesn't take up a distribution slot, and you simply collect the physical item in an exception bin or holding area.
Result: Exception items don't break your distribution rhythm and never occupy a slot — they are all listed together in the Exception Zone tab, and once this batch is done you go through them one by one and decide whether to return them to the shelves or handle them separately, without mixing into someone else's order.
2. Features
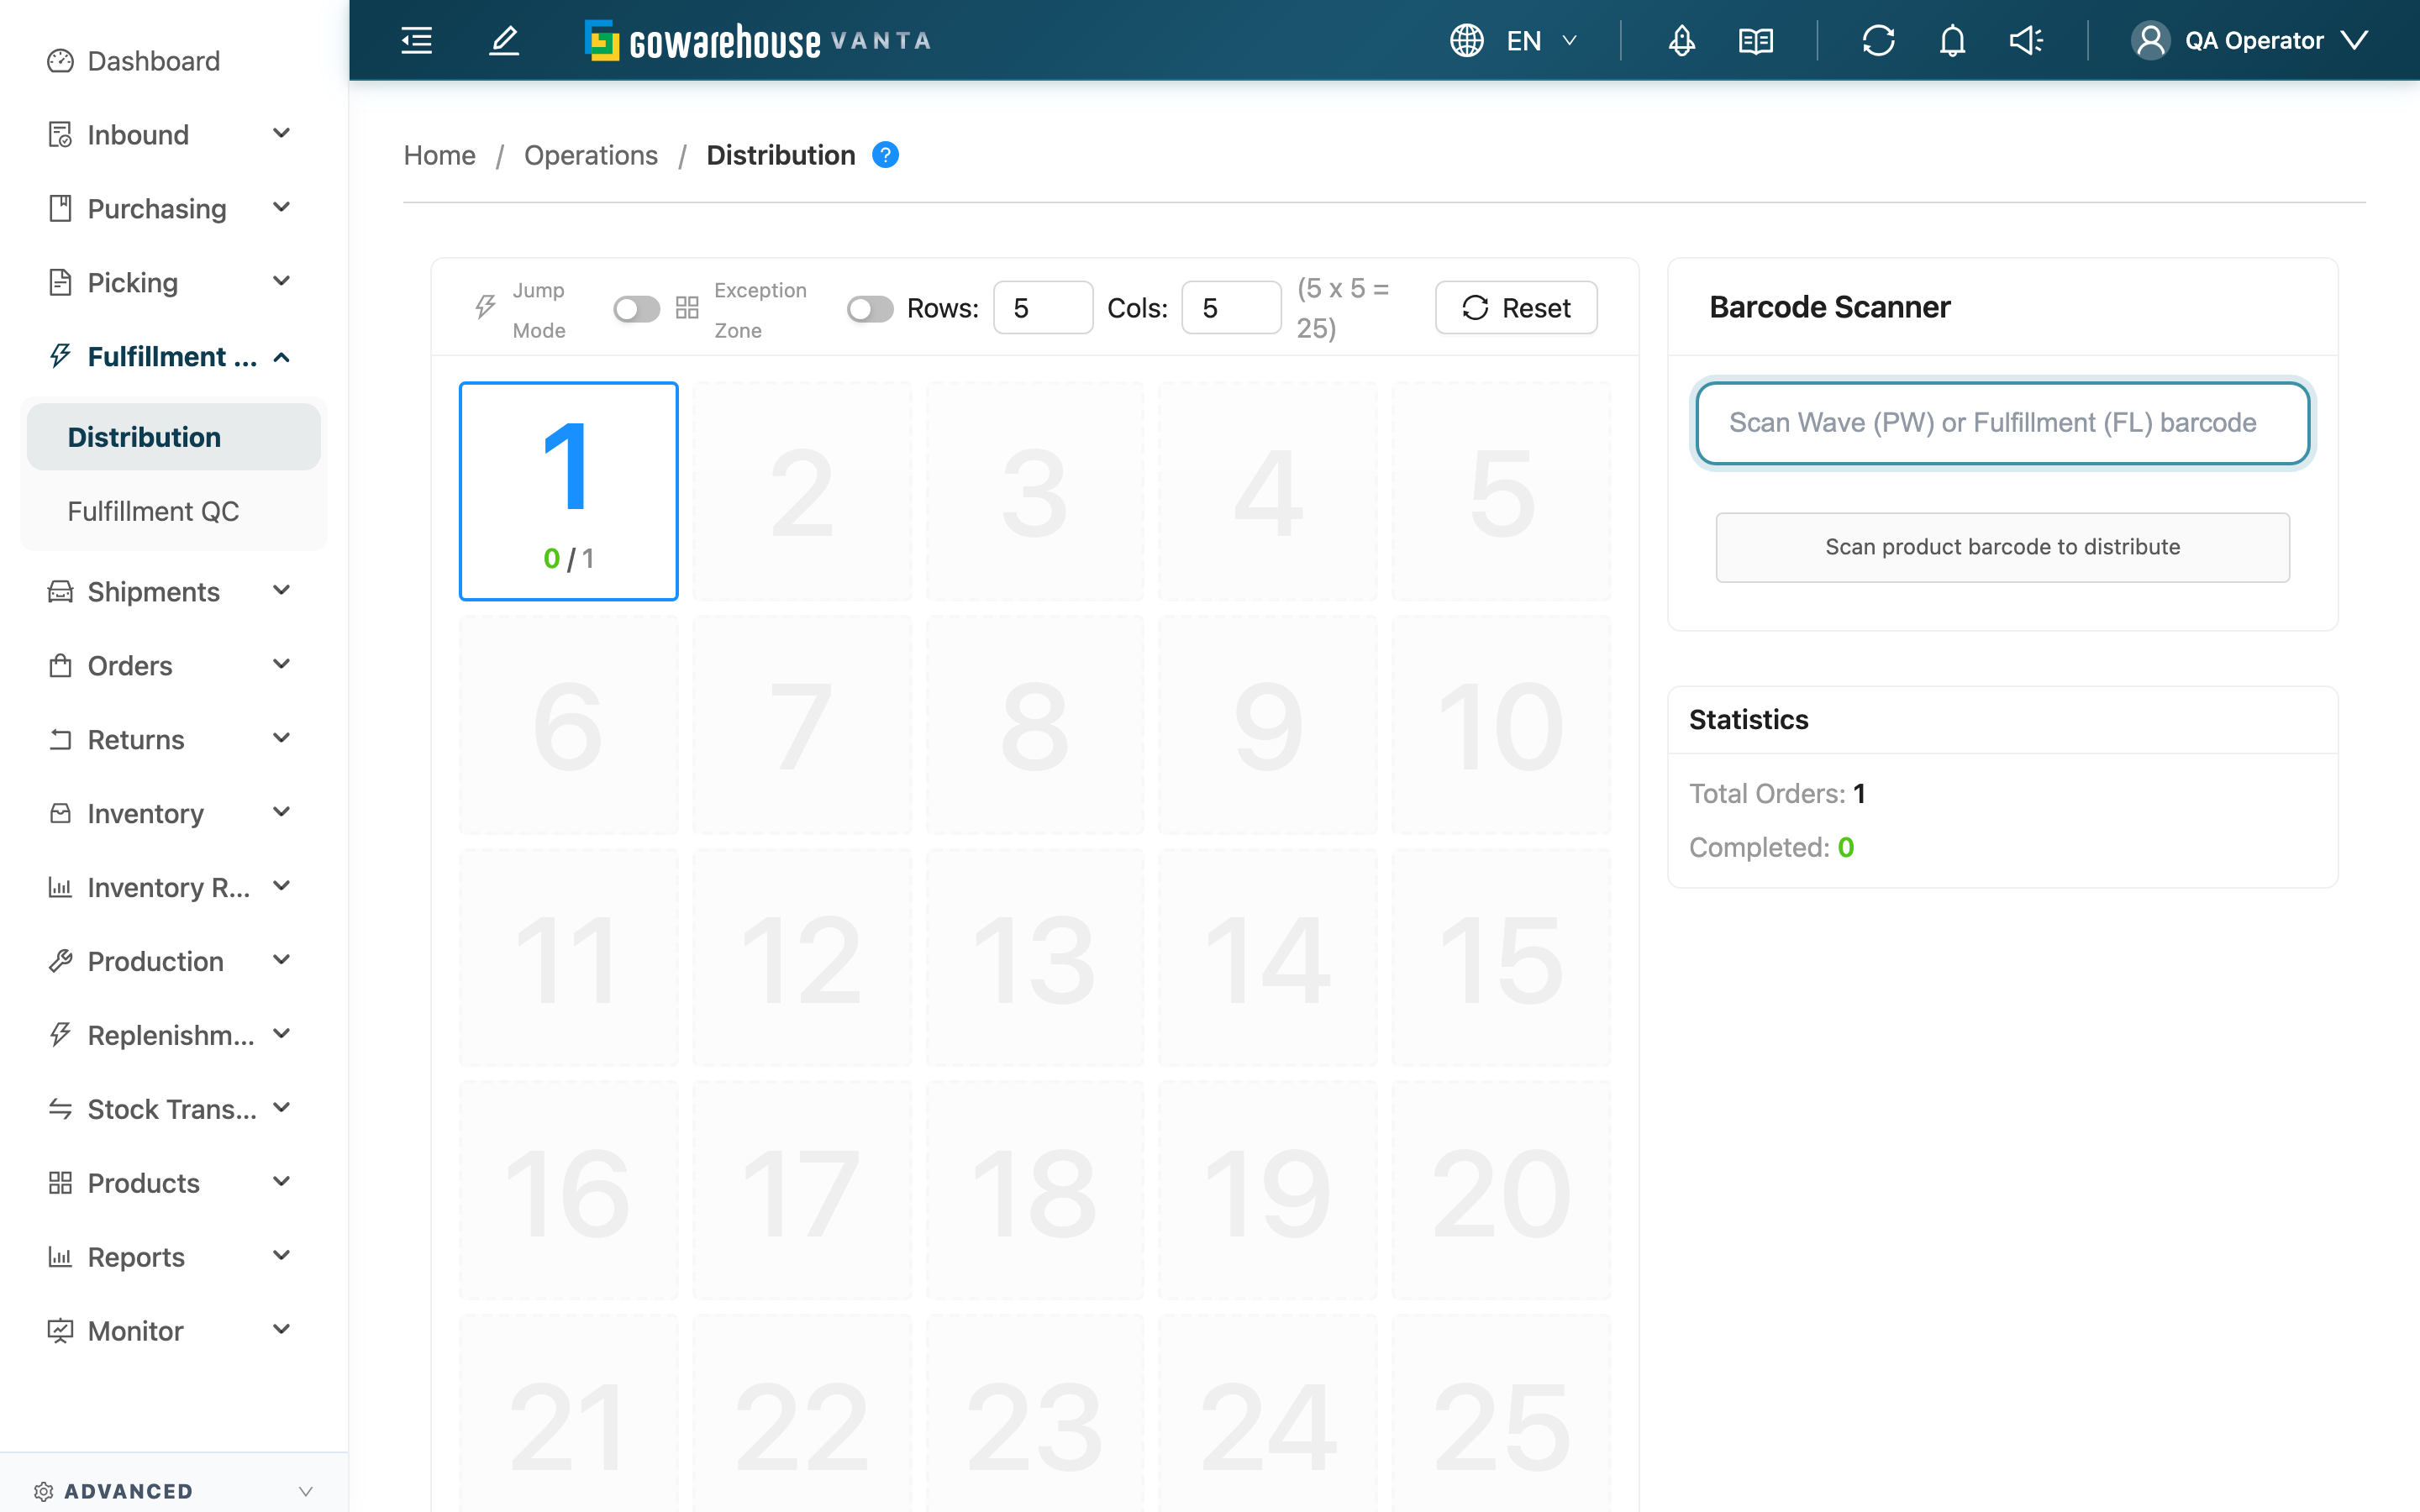
Distribution is the step after picking: wave picking pulls the items for many orders at once, all mixed together, and distribution "sorts" those items back into each order. The left side of the screen is the Distribution Area slot rack (one slot per order); the right side is the Barcode Scanner panel. Scan a wave to load the orders, then scan items one by one — the system uses voice announcements and slot highlighting to tell you which slot each item belongs in.
Quick jump: Load a wave and start distributing | Grid and order details | Exception Zone | Jump mode and Reset
2.1 Load a wave and start distributing
Distribution has two steps, both done in the Barcode Scanner panel on the right:
▸ Step 1: Load a wave
Scan a wave barcode (starts with PW) to load this batch of orders; you can also scan a fulfillment barcode (starts with FL) and the system will find its parent wave. Once loaded, the grid arranges itself by order.
A picking list barcode (starts with PL) cannot load the grid — a picking list can't be matched precisely to each order's slot. Scan a wave or fulfillment barcode instead.
▸ Step 2: Scan items one by one
Pick up an item and scan its barcode; the system matches which order needs it and announces the slot number (e.g. "Slot 3"), and you place the item in that slot. If several orders need the same item, the system guides you in order — fill one slot before moving to the next. When the last item of an order is placed, the voice announces "Slot X complete" and the slot turns green.
The Statistics panel on the right shows the total order count and the number completed, live.
▸ When one barcode matches multiple products
If the scanned barcode maps to several different products in the wave (for example, when multiple products share the same barcode), the system cannot tell which product you are holding — it sounds an alert and opens the "This barcode matches multiple products" dialog, and the scan is not recorded yet. The dialog lists each candidate product's SKU, product name, and its "distributed / required" quantities: products that can still take more show how many they can take, while fully distributed products cannot be selected. Pick one, and this scan counts toward that product with the slot number announced as usual; press "Cancel this scan" and nothing is recorded for this scan — check the item in your hand and scan again. While the dialog is open, scanning is disabled; select a product or cancel before continuing. If every matched product is already fully distributed, the dialog does not appear and the scan is recorded in the Exception Zone as usual.
▸ When one product was allocated multiple batches
This product may have been allocated stock from different batches or expiration dates within the wave — for example, the order in slot 3 needs the batch expiring 2026-01 while the order in slot 5 needs the one expiring 2026-12. The barcode cannot tell the system which batch you are holding, so it sounds an alert and opens the "Which batch are you holding?" dialog, and the scan is not recorded yet.
The dialog lists one option per batch and expiration, showing which slots that batch goes to and how many pieces that batch can still take (demands with no batch or expiration data show "No batch specified"). Pick the option matching the batch and expiration printed on the item in your hand; the system decides which slot and which demand it is recorded against and announces the slot number as usual. Once this product was allocated more than one batch in the wave, every scan asks — even after some batches are full and only one is still short, because the dialog is your only chance to press "None of these (log as exception)" when the wrong batch was picked. When the product only ever had one batch and that batch covers the whole demand, no dialog appears and the one-scan-one-slot rhythm is unchanged (if the demand only locked part of its stock, the leftover shortage adds an "No batch specified" option and the dialog still appears). The same holds when the product has no batch and expiration data at all. Once every batch is full and only demand without allocated stock is left, the dialog still appears with nothing but "No batch specified" on the list: no picking record backs those pieces, so whatever batch is printed on the item in your hand, it does not belong to this wave — press "None of these (log as exception)" to send it to the Exception Zone.
If the batch in your hand is not on the list (every slot needing it is already full, or the wrong batch was picked), press "None of these (log as exception)" and the scan is recorded in the Exception Zone; press "Cancel this scan" and nothing is recorded for this scan. If the batch you selected no longer has any demand left in the wave, the system asks you to scan again rather than silently recording it against another batch.
Batch mode (one scan fills every slot still needing the product) asks for the batch first as well: once selected, only the slots holding that batch are filled, so a full carton is never split into slots that need a different batch.
2.2 Grid and order details
The Distribution Area on the left shows each order as a slot — the color and numbers tell you the progress at a glance:
| Slot appearance | Status |
|---|---|
| Gray empty slot | No order at this position |
| Shows a "distributed / required" number | Order in progress; the numbers are the amount placed so far and the total required |
| Green slot | Order fully distributed |
| Highlighted slot | The target slot you just scanned into |
Click any slot to open the Order Details, showing the order number, merchant, overall progress, and for each item its required quantity, distributed quantity, last scan time, and Actual Batch / Expiration — the batch and expiration of the stock actually allocated to that demand (one demand may span several batches, each listed on its own line; a dash means no allocation). The batch the order itself specifies, when present, appears under the product name as secondary information.
The slot rack size is adjustable: set the Rows and Cols at the top-right of the Distribution Area (each 2 to 10) so the on-screen slots match the physical rack you use. After a wave loads, if its highest slot number exceeds the current slot count, the screen shows the required, current, and missing slot counts and pauses product scanning. Apply the suggested layout, which preserves the current column count, or enter a custom layout large enough to continue. If the physical rack cannot be expanded, press Change wave to return to waiting for a wave scan; this only leaves the current screen and does not delete recorded distribution progress. While product scans are still being processed, the button is temporarily disabled and shows how many scans are pending; it becomes available automatically when all have finished. If the wave needs more than 100 slots, split the wave first (see FAQ).
2.3 Exception Zone
When you scan an item that isn't in this wave, the system sounds an alert with a voice cue and automatically records it in the Exception zone tab — right next to the Distribution Area, with the current count shown on the tab. These items never take up a distribution slot, so your sorting rhythm isn't interrupted; collect the physical items in an exception bin or holding area instead of putting them on the rack.
Switch to the Exception zone tab to see each exception item's product name and SKU, the scanned code, quantity, and scan times; scanning the same item again adds to its quantity instead of creating a new row. Codes the system can't recognize are marked "Unknown Product". Once you've confirmed a record was a mis-scan or has been dealt with, press its delete button to remove it.
2.4 Jump mode and Reset
Jump mode
Turn on Jump Mode at the top-right of the Distribution Area, and each scan shows a large full-screen slot-number animation — easier to read than voice in a noisy warehouse.
Reset
The Clear records button at the top-right of the Distribution Area clears all current distribution progress for this wave, returning every slot to unfilled. To prevent accidental clicks, you must type "clear" in the confirmation dialog before it runs. It also clears the Exception Zone tab, so deal with the physical exception bin before you press it; it does not change inventory or fulfillments (see Important notes).
3. FAQ
Quick jump: FAQ | Important notes
3.1 FAQ
▪ The scan sounds an alert and the item is recorded in the Exception Zone?
It means the item can't be matched to any slot that still needs it. Common reasons: the item isn't in this wave, every order that needs it is already filled, or the barcode/SKU doesn't match. The system records it in the Exception Zone tab automatically and no distribution slot is used; put the physical item in the exception bin or holding area and deal with the whole list after this batch is done. If it was a mis-scan, just delete that record in the Exception Zone tab.
▪ An order doesn't appear in the grid?
When the grid's slot count (rows × columns) is lower than the wave's highest slot number, the system opens the insufficient-capacity dialog and stops product scanning so no item can be sent to a hidden slot. Apply the suggested layout or set the rows and columns high enough to include the highest slot; a custom layout that is still too small cannot be applied. Rows and columns are limited to 10 each, so split a wave that needs more than 100 slots before distributing. If the physical rack cannot be adjusted, press Change wave to leave the current wave without deleting its recorded distribution progress; if product scans are still being processed, wait for all of them to finish before pressing it.
▪ Does distributing change inventory or fulfillment status?
No. Distribution is a live sorting guide and progress record — scanning only tells you which slot an item belongs in and updates the slot's progress. It does not change inventory quantities or fulfillment status. The actual shipping confirmation happens in Fulfillment QC.
▪ If I leave halfway through, is the progress lost?
Progress is kept for a while — re-scan the same wave within 24 hours and your earlier progress is restored.
▪ Why can't a picking list load the grid?
The grid only accepts wave (starts with PW) or fulfillment (starts with FL) barcodes. A picking list can't be matched precisely to each order's slot, so it isn't supported — scan a wave or fulfillment barcode instead.
▪ Several orders need the same item — how does the system split it?
Just scan the same item repeatedly. The system guides you in order: it fills one slot (one order) first, then moves to the next, topping up each order that needs the item in turn.
3.2 Important Notes
⚠️ Important reminders
- Pressing Reset clears all distribution progress for the wave and cannot be undone — every filled slot is zeroed out and the Exception Zone tab is emptied too. It does not change inventory or fulfillments.
- Distribution progress is kept for only 24 hours. After that, re-scanning the wave won't restore the earlier progress and you'll have to distribute again.
💡 Tips:
- In a noisy warehouse, or with a large slot rack, turn on Jump mode for the full-screen slot number — more reliable than listening for the voice.
- After changing the rows and columns, confirm that the on-screen layout matches the physical rack before placing more items.
- Remember to work through the items in the Exception Zone tab after distributing — return them to the shelves or handle them separately, and don't forget to empty the physical exception bin.
4. Related Features
| Feature | Description | Link |
|---|---|---|
| Picking Lists | The picking step before distribution — pull items off the shelves | Go |
| Fulfillment QC | After distribution, QC each order and confirm what ships | Go |
| Fulfillments | View and manage the fulfillments behind the distribution | Go |