
Create Custom Templates
Table of Contents
1. Features
Create a new shipping slip print layout here. Creating it takes two steps: first fill in the Template Name, choose the Applicable Channels and the Paper Size, then edit the layout content — you can use "AI Assistant" to adjust the layout through conversation, and the right side of the page always shows a live preview so you can confirm how it prints before saving. Once created, orders from the bound channels apply this layout when printed.
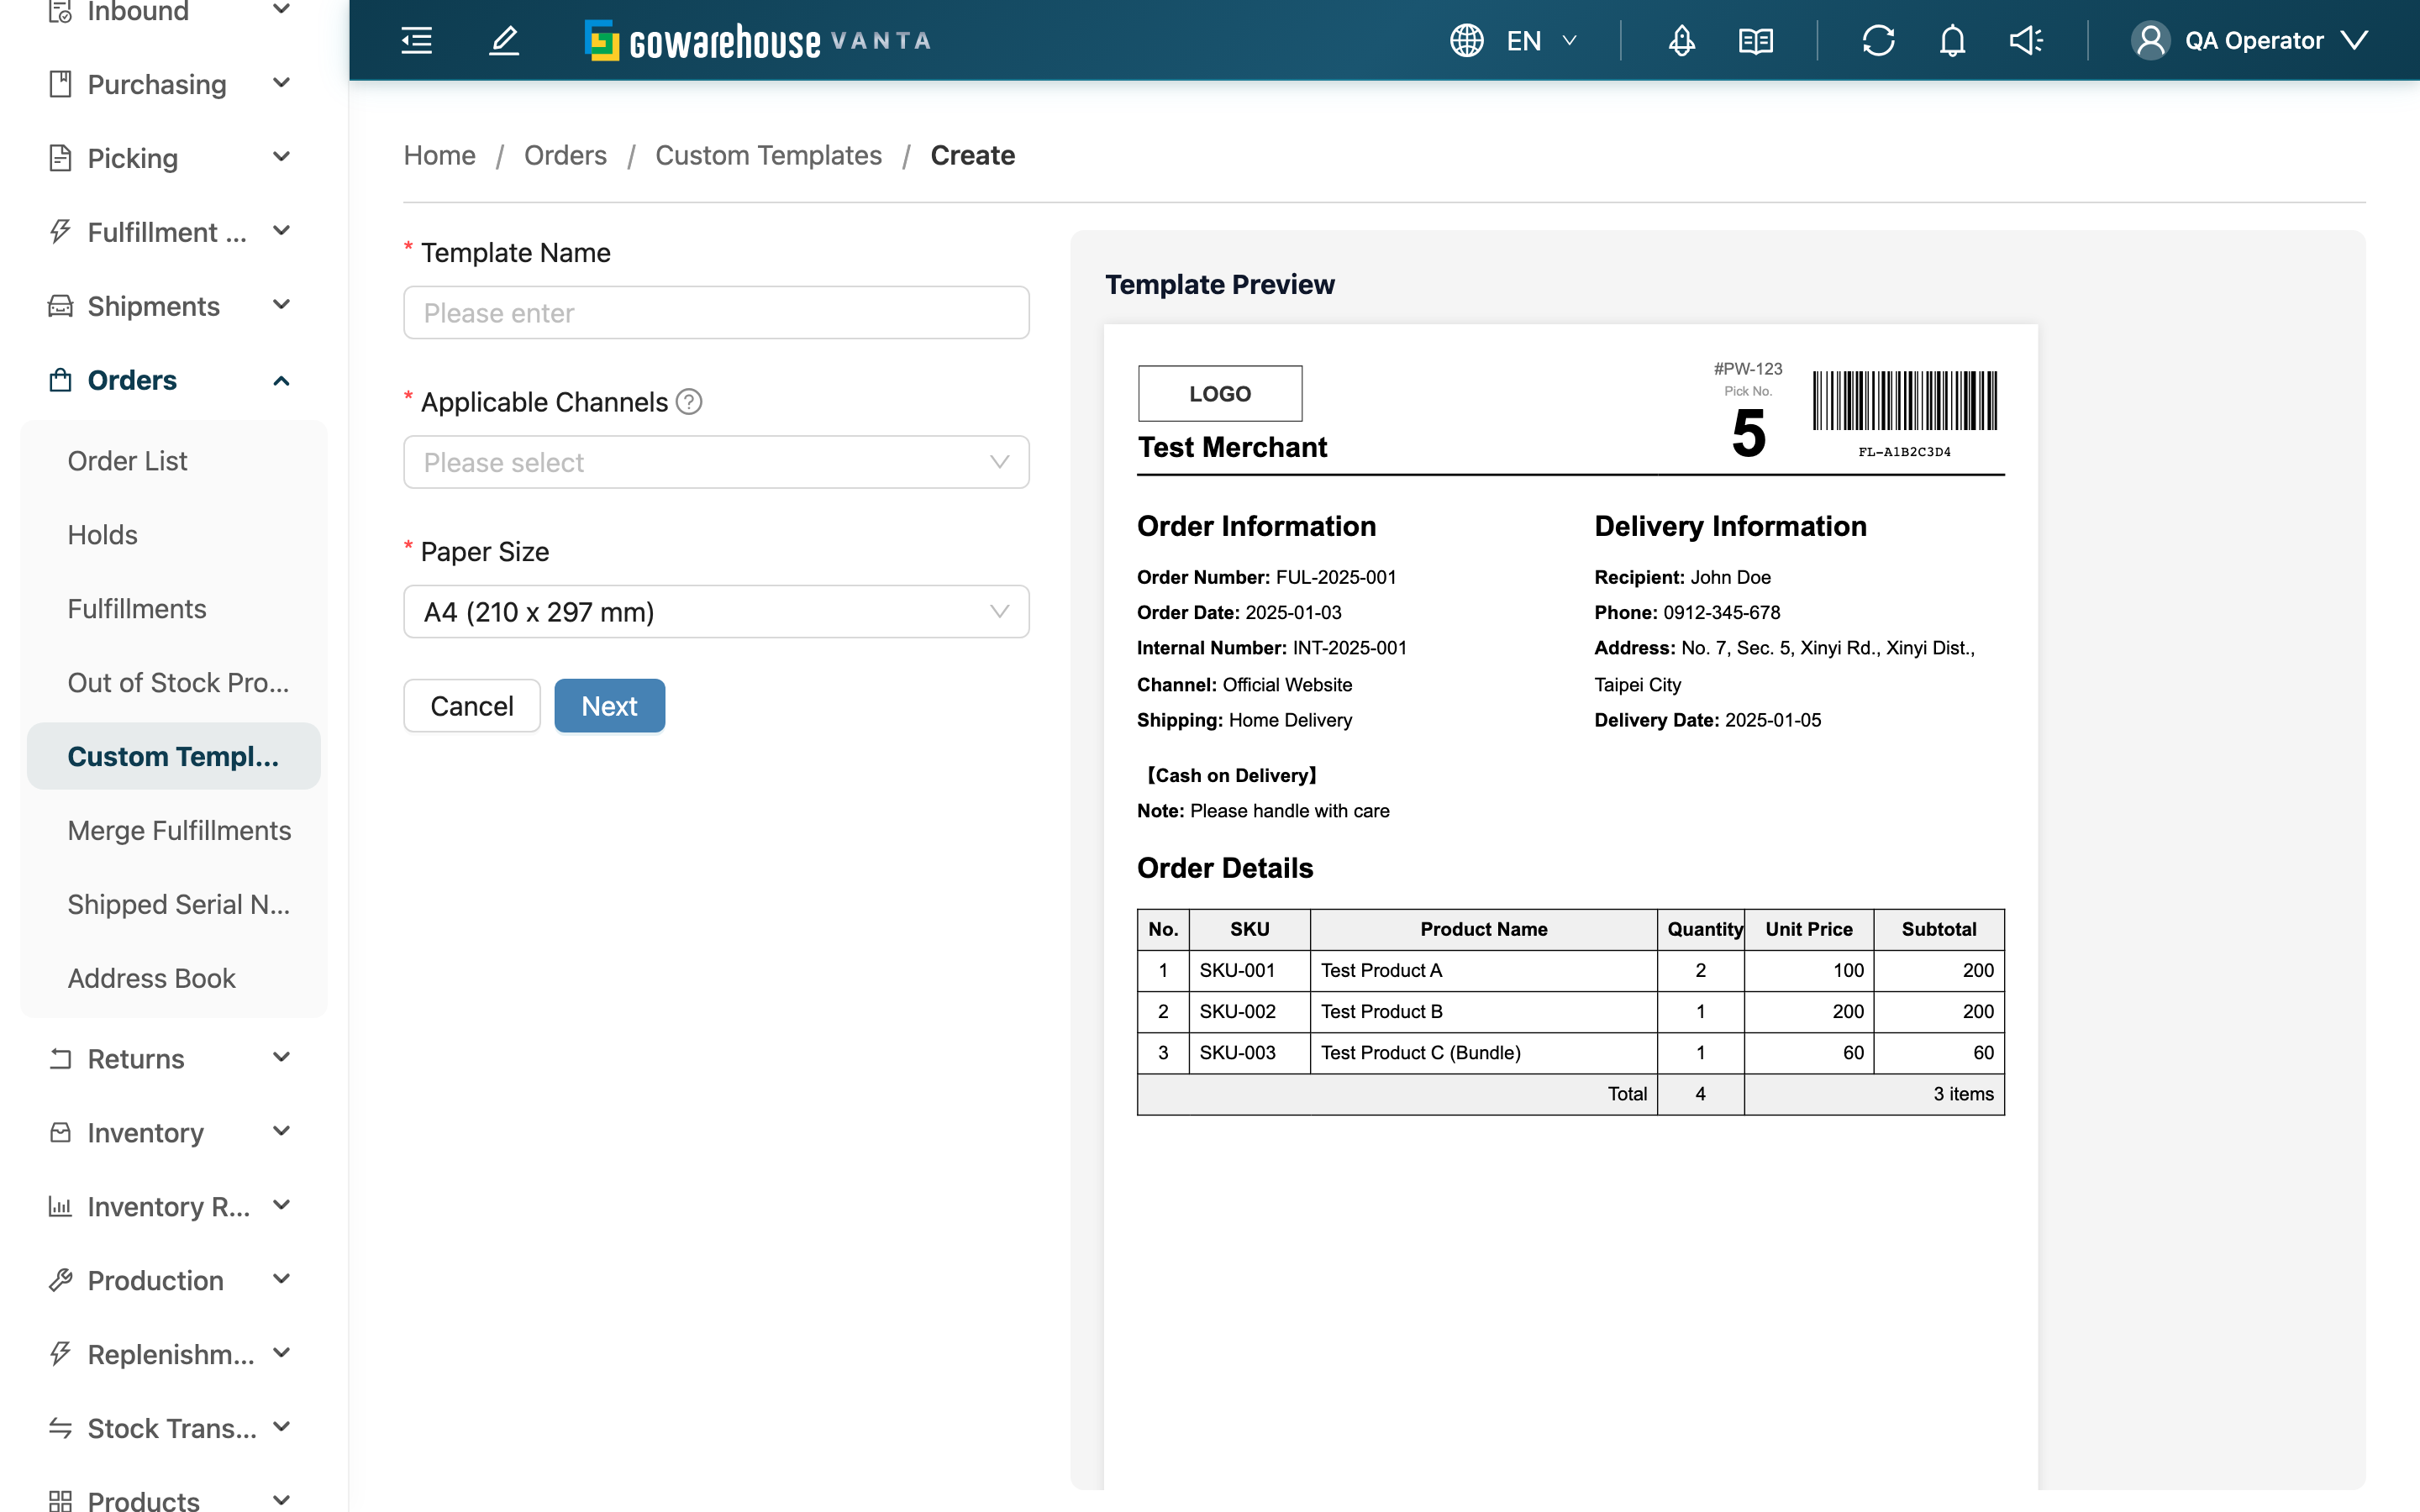
After opening the page, first select a 貨主; the Applicable Channels only list channels under that merchant.
Quick Links: Step 1: Basic Info | Step 2: Edit Content | Live Preview
1.1 Step 1: Basic Info
Fields marked with * are required
| Field | How to Fill | Notes |
|---|---|---|
| *Template Name | Enter an easily recognizable name | Including the channel name (e.g. "Shopee Shipping Slip") helps you identify it later in the list |
| *Applicable Channels | Select the channels this layout applies to; multi-select | If a channel is missing, first check the 貨主 above is correct; a channel applies only one template at a time, so selecting a channel already bound elsewhere rebinds it to this one |
| *Paper Size | Choose A4 (210 x 297 mm), A5 (148 x 210 mm), or Custom Size | When choosing Custom Size, also enter Paper Width (mm) and Paper Height (mm) |
Once filled, click "Next" to move to content editing.
1.2 Step 2: Edit Content
After entering step two, the system has already loaded a built-in default layout that you can adjust directly. Three tools are available:
| Tool | Purpose |
|---|---|
| AI Assistant | Adjust the layout by describing your needs in conversation, e.g. "mask the middle four digits of the recipient's phone", "add a total item count column", "increase the font size of the item list" |
| Edit HTML | Edit the layout's raw content directly, suited for fine adjustments |
| View Variables | View the list of variables you can place in the layout (order info, merchant, channel, logistics, items, etc.); searchable and copyable |
You can also fill in a Description to note the layout's purpose. When done, click "Save"; to create several in a row, click "Save and Add Another", which clears the form back to step one so you can build the next one.
1.3 Live Preview
The right side of the page always shows the "Template Preview", rendering the layout with sample order data in real time and updating immediately as you edit. When actually printing, the sample data is replaced with real order data while the layout and styling stay the same, so what you see before saving is how it will print later.
2. FAQ
2.1 FAQ
▪ How does the layout show order data?
The layout uses variables to represent order data. You can find the available variables under "View Variables"; once placed in the layout, the system replaces them with actual order data when printing.
▪ How do I print the storefront product name from the platform on shipping documents?
Click "View Variables" to see the description of "平台賣場品名" (platform storefront product name) under the "Order Items" group. To apply it, change item.product.name to item.platform_product_name inside the item details loop of the layout content. Orders imported from an e-commerce platform then print the product name shown on the storefront; when the platform provides no name, or for manually created orders, imported orders, stock transfer orders and work orders, the same field automatically prints the master product name instead of leaving a blank. Sub-items expanded from bundle products and flexible products have no storefront name of their own, so they also print the master product name. Existing templates are not updated automatically — templates without this field print exactly as before.
▪ How do I print the convenience store pickup code on shipping documents?
Click "View Variables" and search "超商" under the "Order Information" group to find "超商取貨門市代號" (convenience store pickup store code), then use the copy action on the card to paste the syntax into the layout content (the variable is order.convenience_store_code). Convenience store pickup orders print the store code carried on the order — the same value shown on the order detail page; some platforms return the store name instead of the code, and the printout follows whatever value is actually stored on the order. Home delivery and other non-pickup orders, orders where the platform provided no code, and shipping documents generated from stock transfer orders or work orders leave this spot blank without affecting printing. For merged shipments, order.convenience_store_code prints the code of the earliest-placed order; to print each order's own code, use the loop variable inside the fulfillment.orders loop instead (for example o.convenience_store_code).
▪ How do I print the total weight and total volume of the whole shipping document?
Click "View Variables" and search "重量" (weight) or "材積" (volume) under the "Fulfillment Information" group to find "出貨單總重量" (fulfillment total weight) and "出貨單總材積" (fulfillment total volume), then use the copy action on the card to paste the syntax into the layout content (the variables are fulfillment.total_weight and fulfillment.total_volume). Both numbers are the total of the shipping document itself: for merged shipments they cover every order on the document, and shipping documents generated from stock transfer orders or work orders also print the total of the items on them. Weight is always in kilograms; the volume unit follows the system "Volume Unit" setting and is either "Cubic Meters (CBM)" or "Sai (材, 27,000 cm³)". To print the unit next to the number, add fulfillment.total_volume_unit — it prints CBM or CUFT, always matching the value of fulfillment.total_volume. Existing templates are not updated automatically — templates without these fields print exactly as before.
▪ Why does the total weight or total volume print as 0?
The total weight adds up the master product unit weight multiplied by the shipped quantity, and the total volume adds up the unit length, width and height multiplied by the shipped quantity; a field left empty counts as 0, so start by checking the unit weight and the unit length, width and height on the product master record. The volume also depends on which "Volume Unit" the system uses: under "Sai (材, 27,000 cm³)", a product with no unit length, width or height still gets a volume as long as the large unit (box) dimensions and the items per large unit are filled in, derived from box volume ÷ items per large unit, so it is not 0; under "Cubic Meters (CBM)" there is no such fallback, and missing unit dimensions count as 0. If the master record is complete and the total still prints 0, the total on this document is simply below the output precision — it does not mean the master record is missing values: the total volume keeps five decimal places and the total weight keeps three, and the rounding happens after the whole document is summed up, so the threshold applies to the document total rather than to a single item. On a document measured in "Cubic Meters (CBM)", a total volume under 5 cubic centimetres prints 0 (for example a single 2x2x1 cm screw); on one measured in "Sai (材, 27,000 cm³)" the threshold is 0.135 cubic centimetres (for example a single 0.5x0.5x0.5 cm bead). For the total weight the threshold is 0.5 grams: a product weighing 0.0002 kg prints 0.0 for one piece and 0.001 once three pieces ship. Ship enough of the same product and the number appears, so a 0 on a small document of jewellery or electronic parts is expected. Missing values and numbers below the threshold both count as 0 in the total and never interrupt printing.
▪ Do I have to select channels to save?
Yes. Applicable Channels is required, so you must select at least one channel to save. After saving, orders from those channels apply this layout when printed.
▪ What can "AI Assistant" do for me?
It adjusts the layout through conversation — for example rearranging fields, adding or removing fields, changing fonts and spacing, or adjusting table formatting. After you describe what you need, it updates the layout directly and the preview on the right updates with it.
▪ Will the preview match the actual print?
The layout and styling are the same. The preview uses sample order data, while the actual print replaces it with real order information; the appearance stays consistent.
▪ How do I set up a "Custom Size"?
After choosing Custom Size for Paper Size, two extra fields appear — Paper Width (mm) and Paper Height (mm) — where you enter the values in millimeters.
▪ Can I modify it after saving?
Yes. After saving you land on the template's detail page; click edit to adjust the layout again or rebind channels.
2.2 Notices
⚠️ Important
- The layout content must keep the reserved barcode area variable, or it cannot be saved; "AI Assistant" keeps it automatically, but do not delete it when editing the HTML manually.
- If you select a channel already bound to another template, that channel is rebound to this new template and the previous one no longer applies to it.
💡 Tip: Use "AI Assistant" to tweak the default layout first, checking the preview on the right as you go, and save once it looks right.
3. Related Features
| Feature | Description | Link |
|---|---|---|
| Custom Templates | Manage all shipping slip print layouts | Go |
| Order List | View and print orders | Go |