
Replenishment Location Setup
Contents
1. When to use this
Quick links: Rolling out replenishment | Re-planning the pick area | Raising thresholds before a peak
Scenario 1: Your warehouse is about to start using replenishment
Situation: Until now your pickers have decided for themselves what needs topping up, so they regularly walk to a location, find it empty, and have to go back to bulk storage. You want the system to make that call instead — but it has no idea which product lives in which pick location, or how much fits there.
Use this feature: Set up "product + inventory type + replenishment location + capacity + replenishment threshold" here. A first roll-out is usually several hundred items, so use Import to create them in one go instead of entering them one by one.
Outcome: Once the setup exists, the Replenishment List can work out which locations are below their threshold and how much to move — the whole replenishment flow depends on it.
Scenario 2: Re-planning the pick area layout
Situation: Your order mix has changed. Yesterday's best sellers have cooled off while the new top movers sit at the far end of the aisle, so pickers walk much further every day. You decide to re-arrange the pick area, which means changing the fixed location of several hundred items.
Use this feature: Export the current setup to work out which items have to move (this page lists every merchant you can see, so filter by merchant first to narrow the export down to one). Then filter by merchant, product, inventory type or location to isolate the old records for those items, select them all with "Select all records matching criteria" in the toolbar and bulk delete them. Once the background task panel in the top-right corner shows the deletion has finished, use import to create the new "product + inventory type + new location + capacity + threshold" records in one go.
Note: Changing a location is not something import can overwrite. The location is part of the identity of the record (see Adding and editing manually), so changing the location code in the import file only adds a record — the old one is not removed. The product then has two replenishment locations at once, and both replenishment suggestions and putaway recommendations still count the location you have already moved away from. Import has no "delete existing records from the file" action; old records can only be deleted from the list (one by one or in bulk).
Outcome: Once the old records are bulk deleted and the new ones created, the new pick path is in effect and both replenishment suggestions and putaway recommendations point only at the new locations.
Scenario 3: Raising replenishment thresholds before a peak season
Situation: A campaign is about to start and you expect three times the usual volume. At today's thresholds your pickers will keep finding empty locations during the rush, and replenishment orders will be split into many small batches.
Use this feature: Export, raise capacity and threshold in bulk with an Excel formula, then import the file back with overwrite. Reverse the same way once the campaign ends.
Outcome: The system starts prompting for replenishment earlier, so pick locations do not run dry at peak times.
2. How it works
A replenishment location is the fixed slot your pickers go to every day. This page tells the system which inventory type of which product lives in which slot, how much fits there, and how low it may drop before it needs topping up. Without this setup the system cannot calculate replenishment suggestions, and putaway has no way to know that goods can go straight to the pick face. The page only appears for warehouses in dynamic location mode whose plan includes replenishment.
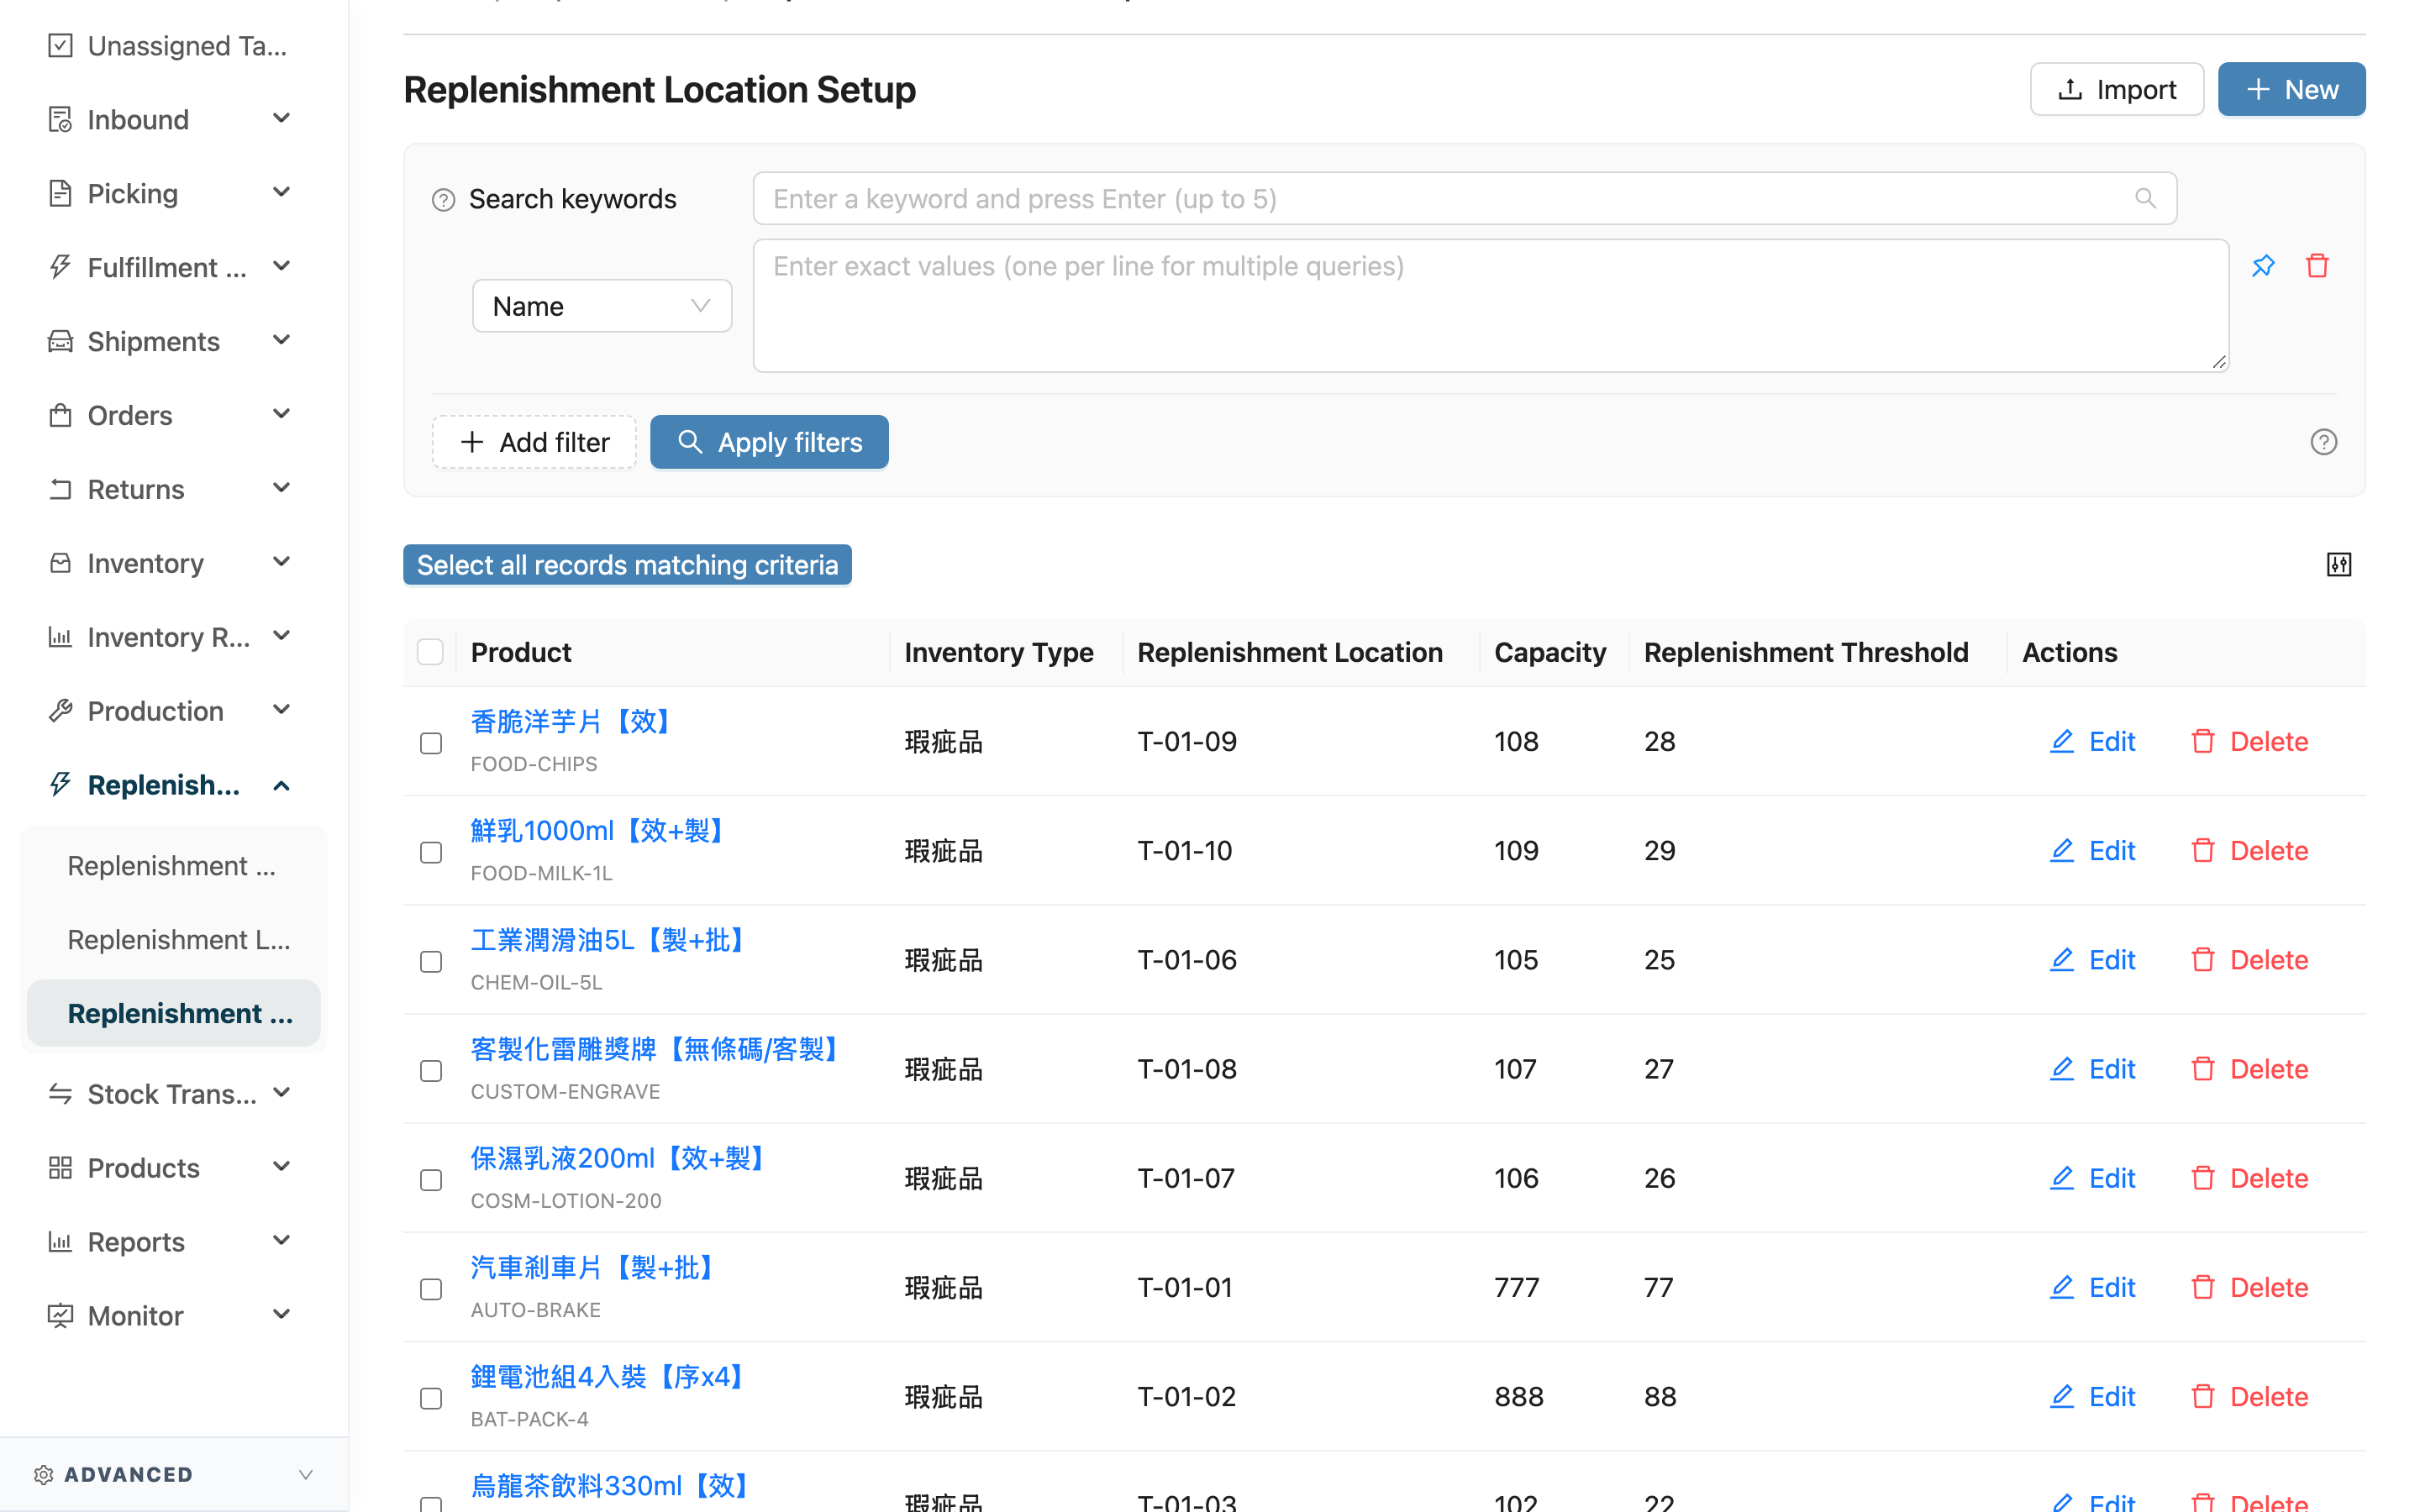
Jump to: What one record contains | Adding and editing manually | Import | Export | Bulk delete | What the setup affects
2.1 What one record contains
Fields marked with * are required
| Field | How to fill it in | Notes |
|---|---|---|
| *Product | Pick the item to replenish | Only products of the current merchant that are not retired |
| *Inventory Type | Pick normal, defective, and so on | Types are counted and stored separately; only types enabled for that merchant can be selected |
| *Replenishment Location | Pick the fixed slot in the pick area | Only locations in the current warehouse |
| *Capacity | How many units fit in this slot | At least 1. Replenishment tops up to this number and never overfills the slot |
| *Replenishment Threshold | The level at which it needs topping up | Must be lower than the capacity. 0 means stock falling below the threshold no longer raises a suggestion; a replenishment need only appears when a picking list requires more than the quantity on the pick face |
There is only ever one record per "product + inventory type + replenishment location". One product can be set up in several locations, and one location can be shared by several products.
2.2 Adding and editing manually
Use New in the page header to open the create page and fill in the five fields above.
The Edit action on each row changes the capacity, the threshold and the inventory type — changing the inventory type here edits the same record in place, it does not add a second one. The product and the location are locked on the edit page (which product sits in which slot is the identity of the record), so changing either one means deleting the record first and creating a new one.
Import works the other way round: if the product, inventory type or location in the file differs from the existing record, the import treats it as a different record and adds a row, leaving the old one in place (import has no delete action). So switching to another inventory type is an in-place edit on the edit page but an extra record through import — the two paths do not give the same result.
Delete removes the record. After that the slot is no longer treated as a replenishment location for that product: the replenishment list stops calculating a top-up quantity for it, and putaway stops prioritising it. To remove many records at once, use bulk delete.
2.3 Import
Use import for the initial roll-out or for bulk changes — it creates or updates many records at once. Click Import in the page header to open the import dialog:
- Select the merchant — SKUs in the file are looked up under this merchant, so it has to be the right one.
- Download the template — the template headers are exactly the five fields the import needs, and the inventory type column comes with a dropdown listing the type codes currently enabled for that merchant. The template contains two sample rows; delete them before importing.
- "Override existing data" — this checkbox is ticked by default. When ticked, rows whose "product + inventory type + location" already exists are updated with the capacity and threshold from the file, with no confirmation step and no way to undo, so untick it yourself if you only want to add records and leave existing ones alone. When unticked, every row that clashes with an existing record is flagged as an error — and because this import is all or nothing, nothing in the file is written (not even the brand-new rows), leaving the existing setup exactly as it was.
- Upload the file — an import record is created; once processing finishes you can review the result under "Data Exchange Logs → Import Logs".
Every row is checked: the SKU belongs to the selected merchant and is not retired, the location is in the current warehouse and is a regular storage location (system-reserved staging areas and carriers cannot be used as replenishment locations), the inventory type is enabled for that merchant, the capacity is a whole number of 1 or more, and the threshold is a whole number of 0 or more that is lower than the capacity. Rows that repeat the same "SKU + inventory type + location code" within one file (case-insensitive, surrounding spaces ignored) are also rejected, and each duplicate row states which other row it clashes with.
⚠️ One bad row and nothing in the file is written
This import is all or nothing: if any row fails validation, even the rows that are perfectly valid are not written, and the existing setup stays exactly as it was. The import record is marked as failed and lists, row by row, which Excel row failed and why. Fix the same file following those messages and upload the whole file again — there is no need to strip out the valid rows.
2.4 Export
Use export to review the current setup or to change it in bulk. Tick a few rows in the list, or narrow the list with filters first and then use "Select all records matching criteria" in the toolbar, and click Export. The file is produced in the background and can be downloaded from the background task panel in the top-right corner.
The exported file has exactly the same columns in the same order as the import template, and inventory type and location are codes rather than names — so once you have changed the capacity and threshold you can import the file straight back with no reformatting (remember to leave "Override existing data" ticked — it is ticked by default). The export only covers the current warehouse and only the merchants you can see.
An import always targets a single merchant (the one picked in the import dialog), so a selection or filter result that spans several merchants cannot be exported — you are asked to filter by merchant first so that the exported file can be imported straight back.
2.5 Bulk delete
When you re-plan the pick area, or a merchant stops storing with you, there are usually tens to hundreds of records to remove — deleting them one by one is not realistic. Tick a few rows in the list, or narrow the list with filters first (merchant, product, inventory type, location) and then use "Select all records matching criteria" in the toolbar, and click Batch delete.
A confirmation dialog appears before anything is sent, and it states how many records this will delete — check that number before confirming. After you confirm, the deletion runs as a background task and does not hold up the screen: progress and the result appear in the background task panel in the top-right corner (the same place as import and export), stating how many records were requested and how many were actually deleted, and the list refreshes by itself once it finishes. Because it runs in the background, confirming does not mean the records are already gone — if you are about to import new records, wait until the panel shows it has finished.
At most 3000 records can be deleted at a time. If the number you selected exceeds the limit, the system tells you the limit and your current count before anything is sent, and nothing is submitted; narrow the filters or delete in several rounds.
⚠️ Deletion cannot be undone
Bulk delete has no undo and no "restore last deletion". Once the records are gone, the replenishment list stops calculating top-up quantities for those products in those locations and putaway stops prioritising those slots; the only way back is to create them again (you can use import, which is why taking an export as a backup before a large deletion is a good habit).
If the number actually deleted is lower than the number requested, the difference is usually records someone else had already deleted before you confirmed. Those records are left untouched.
Bulk delete requires inventory write permission (the same permission as deleting a single row). Without it, the button does not appear in the toolbar after selecting rows.
2.6 What the setup affects
- Putaway prioritises replenishment locations: when goods are received, a replenishment location ranks second only to "same product, same batch consolidation" among putaway recommendations. It is still recommended even when other products occupy the same slot — pick faces are expected to be mixed.
- Expiry-tracked goods have one extra condition: if the incoming goods carry an expiry date, the system only recommends going straight to the pick face when no older expiry date for that product and inventory type exists in the warehouse; otherwise newer stock would be picked ahead of older stock. Goods without expiry tracking are not subject to this.
- A full slot is no longer recommended: once the quantity in the slot has reached the configured capacity, the system drops it from putaway recommendations and suggests other locations instead.
- When the threshold is 0: the system no longer raises a replenishment suggestion because stock has fallen below the threshold. A replenishment need still appears when a picking list requires more than the quantity currently on the pick face.
3. FAQ
Jump to: FAQ | Things to watch
3.1 FAQ
▪ The import failed — do I have to pull out the valid rows and upload them separately?
No. Nothing from the file was written, so correct the flagged rows in the same file and upload the whole file again. See One bad row and nothing in the file is written.
▪ The import says "product not found" but I can see the product in the product list.
Check three things: whether the merchant selected in the import dialog is the merchant this product belongs to, whether the SKU is spelled correctly, and whether the product has been retired. The import only looks for non-retired products under the selected merchant.
▪ What is the difference between "not enabled for the selected merchant" and "inventory type code not found"?
"Code not found" means the code does not exist anywhere in the organization — usually a typo. "Not enabled for the selected merchant" means the code exists but has not been made available to that merchant yet; enable it in the merchant's inventory type settings and import again.
▪ Can one slot be shared by several products? Will everything still fit?
Yes, several products can share one slot, each with its own capacity. Be aware, though, that the system does not check whether those capacities add up to more than the slot physically holds — you need to make sure the split is realistic.
▪ Why did putaway not recommend my replenishment location?
Three common reasons: the slot is already full (quantity has reached the capacity), the incoming goods are not the oldest expiry date in the warehouse, or the inventory type of the goods differs from the one in the setup. See What the setup affects.
▪ I cannot see the import, export or bulk delete button.
Import and bulk delete require inventory write permission, and export requires inventory export permission. Without write permission the import button is greyed out and bulk delete does not appear in the toolbar after selecting rows; without export permission the export action does not appear there either. Bulk delete also only appears once at least one row is selected. Ask your administrator to adjust your permissions.
▪ The bulk delete confirmation says 50 records, but when it finished it said 30 were deleted.
The difference is usually records someone else deleted before you confirmed. Everything you can select on screen is already within your own scope, so in normal use the two numbers match. Skipped records are left untouched. See Bulk delete.
▪ The whole "Replenishment Location Setup" page is missing.
The page only appears in the menu for warehouses in dynamic location mode whose plan includes replenishment. Warehouses using virtual or fixed locations do not have this page.
3.2 Things to watch
⚠️ Important
- "Override existing data" in the import dialog is ticked by default: existing records are changed to the values in the file without a confirmation step and with no way to undo, so check the file contents before uploading. If you only want to add records and keep the existing capacities and thresholds, untick it before submitting (with it unticked, a clash with an existing record sends the whole file back and nothing at all is written).
- After a record is deleted, the replenishment list stops calculating a top-up quantity for that product in that slot and putaway stops prioritising it.
- Batch delete cannot be undone: the confirmation dialog states how many records will be deleted, so check the number before confirming; for a large deletion, take an export as a backup first.
- When several products share one slot, the system does not check whether their capacities add up to more than the slot can hold.
💡 Tip: For bulk changes, exporting, editing and importing back is much faster than editing row by row on screen, and nothing gets missed.
4. Related features
| Feature | Purpose | Link |
|---|---|---|
| Shelves | Create and maintain the warehouse locations; this page can only pick from existing ones | Go |
| Stock Inquiry | Check how much stock is actually on a replenishment location right now | Go |